Saturday, March 31, 2012

Spring Wildflowers

We get some wild flowers.   Wildflowers.

This spring has been so glorious that things have come up together that we haven't seen in a long time.   In this photo, in various stages of bloom and non bloom there are, clockwise from the top center:
  • Twinleaf
  • Dutchman's Breeches
  • Bloodroot [one lone leaf]
  • Toad Trillium
  • Violet
  • Cutleaf Toothwort
  • More Twinleaf
The names are something else, aren't they.

This pic is especially fabulous because you don't often see so many different kinds on one section of woods.   Lily found it and took the pic.

Friday, March 30, 2012

Our Bees are Coming!

Our bees will be here on Tuesday.    It's a couple of weeks earlier than we expected.   That means two extra weeks for the bees to get things going this season.  

We've got one hive ready and will be building the other this weekend.  

And we're reading and studying and talking and reading and researching and studying and talking and reading like crazy.  


We're on TV!

Remember when we went to the studios of WTIU on the campus of Indiana University to film a segment on color theory for The Friday Zone?

Today it's airing!   WTIU is in Bloomington, Indiana - channel 30 or channel 5, depending on your system.   The Friday Zone airs at 4:30pm this afternoon and again at 11:00 am tomorrow. 

Look for the YouTube clip on my sidebar in a day or so.

See you in the Zone!

Thursday, March 29, 2012

Onion Sets

Dude.

I got a nice big bag of onion sets for a dollar forty-nine.

$1.49.

One dollar.   And forty-nine cents.

Plus tax.

Seriously frugal.   Cheap, even. 

So, I got two bags.   A bag of red sets and a bag of yellow sets.

And a couple of weekends ago I planted them.

I like to plant them around the edges of the garden beds.   They're not really in the way and they're really handy to pull up whenever we need one.   

It makes me happy.

The yellow ones were a little bigger than the red ones, so I ran out of them faster.   I had just a hand full of red sets left.  

Maybe I'll put them in my big blue planter.    I think that's a splendid idea.  


Wednesday, March 28, 2012

Visitor in the Cold Frame

We have two cold frames.

Last year a mysterious hole appeared right under a parsley plant in one of my cold frames.

It killed the parsley.   Which really made me mad.

So I dropped a brick in the hole.

But the hole came back.

So I shoved a big blue lake stone in the hole.

And the hole stayed gone for a while.

And then it came back.   You can see the brick and the blue stone that I used last year.

I think I'm going to give up this year and just let it co-exist.   I'll plant the parsley away from it.

I know you're wondering what made it and you're probably not going to believe me when I tell you.

So I"ll let you guess.

Let me know when you give up. 

Give up?

It's a crayfish hole.   We call them crawdads here.   It kind of hurts my brain to call them crayfish.  

We get these holes and muddy mounds all over the place.

All.  Over. The. Place.

Like in my coldframe, which is up on the hill, away from the creek and probably 20-30 feet higher in elevation.

Kinda makes me wonder if they have too much spare time on their hands.

Tuesday, March 27, 2012

Dobby

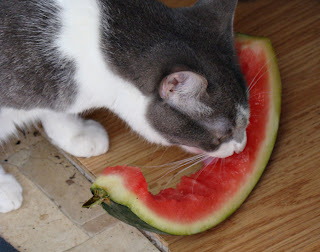
Our Dobby is a strange little cat.  

Want proof? 

She likes apples.   And watermelon. 

She must be a southern cat.   She's definitely K2's cat because K2 is the only one in our house that eats watermelon.  

Weird, huh.

Monday, March 26, 2012

Spring Chicks

We like to keep our laying hens young and productive, so every couple of years we get new chicks.

Plus, we needed blue eggs.

Plus, K2 wanted chickens with hats to match the duck with a hat.

So.  We just HAD to get new chicks this year, Mama.   Pleeeeeeese?! 

But it was kind of early.   So we said yes, but you have to wait. 

So every time K2 passed by me, she said, 'Peep, peep, peep, peep....'

It was annoying.   But kind of cute.  In an annoying way.  

And then it got stinkin' hot, so we went ahead and got them earlier than we planned to. 

Now every time I pass the chick pen, I hear, 'Peep, peep, peep, peep....'

K2 would spend all day every day holding those chicks if I let her.   The truth is, the chicks would be thrilled, too.   They love her already.   

We have three Ameracaunas - hopefull all will have blue eggs, and two Polish - those are the black ones with the white hats, very Chanel, and one silver laced Wyandotte, whose name is going to be Luna.   At least that's what I'm going to call her.

Sunday, March 25, 2012

Cheese Brine

That queso fresco that I made the other day wasn't salty enough. 

Which I totally don't get, because the recipe called for 2 whole tablespoons of salt, which I put in, but then later I read that sometimes if you put too much salt in, it leaches calcium and for some reason that makes it taste way less salty, which I don't really understand or have the brain capacity these days to investigate until I do understand because it's the beginning of gardening season and we homeschool and I have two other jobs and I'm kinda busy and distracted all the time and maybe the cheese wasn't salty enough because we have hard water or because the whey hadn't finished draining when I put the salt in.   Or something. 

At any rate, the cheese needed to be saltier.    And when we've got this kind of cheese at the store, it's pretty wet and sort of briney. 

So I made a brine for our sad saltless queso fresco.

2 quarts of water
1/2 cups of canning salt.

Boil it all.    It'll make salt marks on the top of the pan because the water is super saturated with salt.

And when you splash some on the stove and come back in a 1/2 hour, there will be cool little salt rings all over. 

It's cool

But then you have to wait until it really is cool.   Down to room temp.   And then you can slice the cheese and set it in the brine to salt up. 

Which is what I did.

I sliced the cheese and put it in a bowl.   Then I sprinkled a few spoonfuls the brine on and shook it around.  I didn't want the cheese floating in really salty brine; I just wanted the cheese a bit saltier.

Then I put the lid on and shook the brine around and upside down to get it all over the cheese.

And it worked.   Everyone gave it a thumbs up. 

So now I can make pressed cheese and fix the saltiness if I need to.   It's kind of exciting.  Eric brought home two more gallons of milk.   We're voting on what kind of cheese to make next.

Saturday, March 24, 2012

Queso Fresco


I'll just give you a second to admire this beautiful cheese.


Need more time?   OK.


Last year, I got this gorgeous book and made some feta with it. 

It was good.

But the process was really uncomfortable.   It was all new to me.  Plus there was a lot of hurry up and wait business. 

And the stirring.   All the stirring. 

And more waiting.  

And heating things up just a couple of degrees over 30 minutes.    That one really threw me last year. 

But I made my feta and tried not to whine too much.   And K2 ate it and loved it.  

And everyone was ready for me to make some more.  Plus Eric had made that fabu cheese press and we had to try it out. 

So I closed my eyes and opened the book to this page:

Queso fresco.   And you only have to age it overnight.  

Per.  Fect. 

Because overnight is as long as K2 can wait.

The directions were pretty similar to the ones for the feta, so the whole process seemed familiar.  

And I didn't panic with the whole 'raise the temp 5 degrees over 30 minutes' business.   I just did it.

And this is how:    I was using a huge pot - the same one I use for maple syrup - and I didn't have another one big enough to use as a double boiler outside my cheese pot so I could heat it indirectly, which is the way They recommend.

So, I just turned my burner a little past 1 and watched things very carefully and that did the trick!   I raised the temp just fast enough.  

Whew.   That one step had me pretty worried, so I was very relieved when the curds did exactly what they were supposed to do.  

And now I'm not afraid of that anymore, so future cheeses will be relatively stress free.  

I hope.

This is my beautiful cheese!

It's really good, but not salty enough according to the tasters.

However, no one complained about it in our breakfast souffle [Thank you, Eric!] so I'm thinking it won't last long.  

Especially since I'm going to slice it and brine it and that should make it saltier.

Brine information tomorrow.  

Friday, March 23, 2012

Cheese Press

There are some pretty fancy cheese presses out there.

At some pretty fancy prices.

I neither have the disposable income for a press, nor the place to put it. 

If I had a place to put it, I might be more inclined to find the disposable income needed to get it.   Or beg it for a gift.   Or something.

In the meantime, we...actually, Eric put his head to the problem and came up with this cheese press.

He's freaking brilliant.

Brilliant, I tell you.

And this is how it works:

He got a 6 inch pvc union.   At Menard's.   Where we regularly save big money. 

It didn't matter that there was a ring in the middle.   We were kind of worried about it, but when we put the cheese basket inside it, the top of the basket rested comfortably just touching the inner ring and fitting perfectly right inside it.

Perfectly. 


Here is the cheese in the cheesecloth in the basket in the press.

It's beautiful, isn't it. 

So, after we put the cheese in the cheesecloth and then the cheese filled cheesecloth in the basket and the basket in the press, it was time to put the weights in.


And what weights did we use?    Why the weights that hang out in the back room where they are not used by anyone for upper body development but rather contribute to the overall clutter of the back room, of course. 


Yep.   Those weights.

We have little ones and bigger ones.

And guess what?

They fit right inside the press.

Perfectly.  


But before I put the weights in, I put an old plastic lid over the cheese.


And after that, I put a ziploc bag, so the weights wouldn't touch the cheese at all.

At all. 


And then, finally,   I put the weights in.

I put the little ones in first in case things pushed down below the ring in the center of the pvc union.

Because the big weights fit inside that pvc union just perfectly.


Just like this. 

Those big weights fit right inside, but if they jiggled a little, I was afraid they'd get caught on the inner ring.

And so my cheese got pressed at exactly 35 pounds of pressure for the 6 hours required.

And it was delicious.

And Eric got the first taste because he's brilliant.

Brilliant, I tell you.

Amen.

Thursday, March 22, 2012

In the Studio


It's dye season again.    I'm in the mood for vivid brights.

Not just brights.   Vivid brights.

Like these.

These are vivid, right?


A new yarn for this year is Rayon Flag.  It's in the center right of the pic above.   Here's a closer pic. 

It makes me happy. 

Wednesday, March 21, 2012

Carrot Cake Doughnuts with Cream Cheese Glaze

I know.

I know!

They sound fabulous don't they!

Trust me, they are.    And they're good for you!  -  Carrots!  Oats!!   Mmmmm.

We made these with that wonderful doughnut maker that I won on Chickens in the Road.   Remember....

It made wonderful brownies!

But I was hungry for carrot cake.

And cream cheese frosting.

Mostly the frosting.

I'm sure you understand.

I'll get right to the point.   Here's the recipe:

Carrot Cake Doughnuts [or muffins,  or cake or whatever.]

Plug in the doughnut maker.
  • 1 1/2 cups grated carrot
  • 1 1/2 cups ground whole oats/oatmeal [No, you don't have to grind them.  This is America.]
  • 1/4 cup water
Combine these in a microwavable bowl.   We microwaved them for 1 minute, then stirred, then 2 minutes, then stirred, then 1 more minute.   Stir well.   Make sure the carrots are cooked enough for you.   They won't cook long in the doughnut machine.

When the carrots are soft enough for you, add:
  • 3/4 cup sugar
  • 1/2 cup oil
  • 2 eggs, beaten
  • 1/4 cup flour
  • 3/4 tsp cinnamon
  • 1/2 tsp baking soda
  • 1 tsp vanilla
  • 1/4 tsp salt
  • dash nutmeg
Ready to come out!
Stir well.   Pipe into the doughnut maker.  [Don't try to spoon it in - too messy!   Use a ziplock bag with a corner cut off if you don't have a fancier piping tool.   You'll be glad you did!]

Bake doughnuts for 6 minutes.  Take them out and let them cool a bit.   Glaze when warm.   Or not.  Whatever you want.   I glazed them when they were very very warm so the glaze would melt all over and get gooey.    This is the glaze I made:

Cream Cheese Glaze
  • 1/2 block of cream cheese
  • 1 cup powdered sugar
  • a few drops of milk - only if necessary
Melt the cream cheese in the microwave.   Stir in the powdered sugar.  If the glaze is too stiff, then add a couple of drops of milk and stir well. 

Tuesday, March 20, 2012

Doughnut Maker

As some of you know, in addition to this blog, I also write for Chickens in the Road, a country living blog by Suzanne McMinn.   You might have already seen it listed in my sidebar.   If you haven't already, please check it out:   Chickens in the Road

Once a month, Suzanne does a giveaway to one of her blog contributers and last month I was excited to be the winner of this doughnut maker.


Pretty, huh!  I especially like the sprinkles on top.

The girls, especially K2, were excited to try it out right away, so I turned them loose and they decided to make brownies in the doughnut maker. 


Brilliant!

They started with their favorite brownie recipe.

It didn't take long to figure out that it was much easier to pipe the batter in than it was to spoon it in.   K2 pulled out her Dessert Decorator Plus, by Wilton and filled it up. 


Then she piped the batter into the doughnut maker.

It generally takes 6 minutes to bake doughnuts, but the brownies took a bit longer.

Make sure you pipe them full - up to the edge.  They'll rise into the top spaces just fine.

Let them bake for 8 minutes and Ta-DA!


Brownies!
With crispy edges all over!

Notice that one in the back with the slump?   That's one that wasn't filled all the way.

Delish!     Thank you SO MUCH, Suzanne for this wonderful new tool!

Tomorrow - carrot cake doughnuts with cream cheese glaze!   Stay tuned for the recipe.

Monday, March 19, 2012

Peepers

The peepers are out in full force lately.   Little bitty red frogs.  They sound like jingle bells from a distance.  Our neighbor has one that visits her on her kitchen window. 

Here's a wiki article with photos.

Spring is here.   

Sunday, March 18, 2012

Early Bees

I'm really excited about starting the hives this year.  The truth is, I've become just a teensy bit obsessed with bees.

I've been reading some great books and watching tons of YouTube vids all about bees.  

I heart YouTube.

But that's not what I'm here to tell you.

I'm here to tell you that the feral bees are out!!

We've seen a couple of different kinds - the brown/gold kind and the black/yellow kind.     I'm thinking that maybe there are two feral hives somewhere close by.

It's possible.

My photography skills aren't stellar, but I just had to try to get some photographic proof that the feral bees are flying.

So today I sat down in our bed of grape hyacinth and took lots of pics of flowers where bees had just been. 

It's hard to take pics of bees.

They move around a lot.

A lot, I tell you!

And then I got this one.

I hope you're impressed.

Take a look at that big yellow spot on her back leg.   That's a pollet basket.  Bees mix the pollen they gather with bee spit and pack it into their baskets to take back to the hive.   You can tell she's been busy.


March Sunrise

While I was at the top of a hill trying to get those pics of the moon setting off to the west the other day, I turned around to the east and got these.  

That moment - the very first moment the sun winks over the horizon - takes my breath away.

Saturday, March 17, 2012

March Moonset

The other day we left home right at sunrise.  To the west the full moon was just setting and it was huge and orange against a heavy blue horizon. 

Gorgeous.

No camera.   I told the girls to look hard because they'd probably never see the moon light that again.   In all my years, I'd never seen a moon like it. 

And the next morning, since the weather was the same,  I got up with fingers crossed and camera at the ready to go hang out on the road in that part of the county just in case the moon did the same thing.

It didn't, but I did get some other nice pics of other things. 

And just as I got back to our place, I got this pic of the moon setting over our trees.   Pretty.


Friday, March 16, 2012

Remember when it snowed?

I know it's kind of schizophrenic to go from tropical fruit trees yesterday to snow scenes today.   These are from a week or so ago.   Just a couple of days after those tornados ripped through southern Indiana.

That's what the weather in Indiana is like.

Not that it's actually snowing today.


And not like we grow tropical fruit trees here, except in greenhouses and studios with a lot of windows. 

It's just that the weather in Indiana is variable. 

Variable, I tell you. It's supposed to be 80 degrees again today.


And sometimes the daffodills bloom and then it snows a couple of inches overnight. 

And in the morning Lily gets up and takes these gorgeous pictures of our gorgeous place in the middle of nowhere Indiana. 

Life is good.

Thursday, March 15, 2012

Meyer Lemon Tree

A good soul gave me a Meyer Lemon tree in sad shape to try to rehabilitate.  It's doing well and I've got loads of blooms on it this year. 

Rumor has it that the tree has to feel old enough before it actually bears -- as in, it doesn't really matter how old it is, it likes to wait for a few years and 'few' can be 'many' if it's not ready.

Weird, huh.

I don't know how old this one is, so I'm pollinating it myself with a tiny paint brush just in case this is the year it decides to make lemons. 

I brush all over the sepals and then the pistil in the center of every blooming flower.   Then I go back and do it again so that everybody is getting someone else's pollen. 

I hope it works.

Wednesday, March 14, 2012

Sky and Tree

K2 took this pic while she was standing underneath the redbud tree in Lily's garden.    You can see the buds starting to form on the tree.  
Notice that gorgeous evening sky.    In clear weather our skies are spectacularly blue.   Very different from the buttermilk sky that this part of Indiana is known for.

Tuesday, March 13, 2012

Organic Cotton

There's been a lot of talk lately about organic cotton. 

Here's the hard truth:

If a yarn has dye on it, it's not organic.  Period.

What about natural dyes?   Aren't they organic?   No.   Natural dyes require non-organic [and sometimes quite nasty] mineral mordants to set the dye.   Not organic.

Synthetic dyes are synthetic, not organic.  

Yet you will still see dyed yarns advertised as organic.   What's the deal?

The deal is that the cotton was grown organically.   No pesticides, no fertilizers. 

If you're serious about organic cotton, then stay away from any dyed cottons.    The dye chemicals that commercial yarn manufacturers use are just as bad as the pesticides and fertilizers that you want to avoid.   Look for natural, unbleached, undyed cotton yarns. 

Here's a peek at the beginning of the organic, naturally colored cotton project.

Monday, March 12, 2012

Turkey Tail

We see two types of turkey tail out here in the boonies.   The first is the kind that grows on a  turkey.     Gobble, gobble, gobble.

The second is the kind that grows on a dead log.   This is that kind.   It's pretty.   It's abundant.

You're supposed to be able to dye with it, but I haven't figured out how to get the dye out of it.  If anyone knows how, let us know in the comments. 

Sunday, March 11, 2012

Guy Towels

Guy towels. 

These towels turned out way brilliant.   Ideal for dudes who aren't afraid of kitchens.  Ideal for kitchens in cabins in the deep dark woods.   Or on mountains!   Or by lakes!  Or hunting cabins!

I'm definitely making more of these.

The details:
Handwoven by me of 100% cotton. $20 each.   I do them in sets of four if you want a set.  Machine washed and dried.   16"x24" right out of the dryer.   Email me if you want them before they go up on etsy.   robin at morenna dot com

Saturday, March 10, 2012

Visitor in the Chicken Coop

The other night, K2 was putting the ducks in the coop and as she was closing the door, she noticed what she thought was a cat in the coop with her ducks. 

Only it wasn't a cat.

It was a possum.

I know you're supposed to call them O-possums, but the truth is, out here, no one has seen or heard that O in maybe a century.   They're possums.   The end.

Anyway.

It was a big one.  K2 screamed for help and Eric came running to take care of it.   He got K2 and the ducks out of the coop and dispatched it with a shovel.

Possums die hard. 

Seriously.   It's almost impossible to kill one.   It's the possum superpower - near-immortality.

Last year, during the winter, when there was snow on the ground we came home one afternoon to find one trying to get into the coop.    I dispatched it with a shovel.   Then I left it for a minute.  When I came back it was alive again.   So I dispatched it again, with emphasis.  And when I was done, I tipped a bucket on top of it and put a big rock on it so that Tibby wouldn't get it.   When Eric came home and took off the bucket, the damn thing was alive again.  So Eric dispatched it again.   With emphasis.  Permanently. 

He did the same thing with this one.    

Geez.

Friday, March 9, 2012

Berry Prism Towels

More prism [not prison] towels in berry brights.  Purple, blue, gold and green.    These are Lily's favorite, so far.  

Details:  Handwoven in 100% cotton.  $20 each.   I do them in sets of four if you want a set.  Machine washed and dried.   16"x24" right out of the dryer.   Email me if you want them before they go up on etsy.   robin at morenna dot com

Thursday, March 8, 2012

Tibbs

Tibby.   She just ran down and leaped into the creek to scare the ducks.  She doesn't look very sorry.

Wednesday, March 7, 2012

Prison Towels

Just kidding about the prison thing. 

When I posted the first set of Prism towels,  one of my friends mis-read it as Prison Towels.  We made a bunch of jokes about towels in orange stripes.

Then I made these towels and Eric said, "Hey!  You made Prison Towels!'

Because we're old enough to remember when prisoners [on TV] were dressed in loud black and white stripes.

Not orange.

It was funny!

Really.

*crickets*

Anyway....

I like them.   And I'm thinking you will, too.  And if you want them, you can buy them!

The nitty gritty details:
They're handwoven by me, myself and I out of cotton. Shades of grey and black.  $20 each.   I do them in sets of four if you want a set.  Machine washed and dried.   16"x24" right out of the dryer.   Email me if you want them before they go up on etsy.   robin at morenna dot com

Tuesday, March 6, 2012

Rhubarb

Yeah,  I know it's hard to tell what it is,  but those little red nubbies coming up...this is rhubarb!

Which means it's really Spring!   And that I didn't kill it!   Whoo-hoo!

Over my gardening career, I have killed loads of rhubarb. 

Loads, I tell you.

Then we built the raised beds and put in tons of sand and now my rhubarb is happy. 

Happy, I tell you.

I think it's time to start thinking about strawberry rhubarb pie.   Yep.

Monday, March 5, 2012

Spring Towels

I've been weaving.   And weaving.   And I'm having loads of fun putting colors together. 

Here are some perfectly pastel towels in time for the Spring holidays.   Calming shades of soft blue, green, yellow and tan.  

The nitty gritty details:  
These are handwoven of all cotton.  Machine hemmed.   They've been machine washed and dried.  They measure 15" x 24" [or a little wider] right out of the dryer, so they won't shrink any more.    [These are the same types of towels that I use in my own kitchen.   They last!]

$20 each.   I weave four at a time if you want a set.    Email me if you want to get some before I put them on etsy.    email:  robin  at morenna  dot com

Sunday, March 4, 2012

Windflowers

Not long after we moved here, I planted a couple of little bags of dried up windflower bulbs that I had gotten on sale somewhere.   They're happy here and spread like crazy.   Mostly blue, with the occasional white one.

They have naturalized all over our front yard and they bloom just after the snowdrops, with the crocuses.

Pretty.

Saturday, March 3, 2012

Carved Letters

In our iris bog, there stand two enormous beech trees.  

Enormous,  I tell you.

They are old.  The tops are starting to come down and we can tell that they are starting to hollow out.   A spring bubbles up from beneath the roots of one of them. 

And one day, on close inspection, we noticed that about seven feet up, some markings on the tree.

That's a CW on the left and a big K on the right.  It looks like K's knife was a little sharper. 

I wish they'd put the date, too. 

There were two K's who grew up on this place in the 1930's and 40's.   I wonder which one left his mark.  And who was CW?   
Related Posts Plugin for WordPress, Blogger...