Friday, August 31, 2012

Carrots

I grew carrots from seed this year.

They are woody and very bitter. 

At least they grew.  

The end.

Thursday, August 30, 2012

New Squash - Queensland Blue

This is a baby Queensland Blue squash. 

I've tried to grow this before and gotten nothing, so I was pretty darned happy when I finally got a big one this year. 

We put extra chicken manure in the bed.   Apparently, it matters. 

I love that awesome shape.  

The big question is whether it is going to actually be blue or not.

A few weeks later, this is what I've got.

It's looking pretty blue.

Now I have to figure out what to do with it, because frankly, I've been so amazed at the transformation, that I forgot to see if we could eat it. 

I got the seed from Baker Creek.   If it's tasty, I'll do more next year because now I have to have blue squash.

4th Street Festival of the Arts and Crafts

If you're in the Bloomington, Indiana area on Labor Day weekend, then I hope you stop by the 4th Street Festival of the Arts and Crafts to see us!  


Here's the website:  https://sites.google.com/site/4thstreetfestival/


And here are the basic details:
4th Street Festival of the Arts and Crafts
Bloomington, Indiana
4th Street between Grant and Indiana
Saturday 10 am - 6 pm
Sunday 10 am - 5 pm

Come by our booth on the north side of 4th Street between Grant and Dunn to say hello and buy some of my hand painted silks, or a handwoven scarf, shawl or towel.    

[You'll probably need to bring an umbrella this year, but you'll have a lot of fun and see some amazing art even if it rains.]

Wednesday, August 29, 2012

Chinese Red Long Beans

I've talked to you about my Chinese red long beans before.    I saved seed from the ones last year and planted it this year and they came up and produced beautifully.   No problems at all with them.   I also got some seed from Baker Creek for some Chinese green long beans and I was surprised to see that the green beans are much later producing than the red ones.    My red ones burst out of the ground, climbed the trellis and bloomed and bore like crazy.   The green ones sprouted, took their time climbing and once up there spent several weeks admiring the view instead of putting out flowers. 

It's possible that the red beans like the heat more than the green ones.  That's my theory, anyway.   

The pic above is of the red ones on their side of the trellis.   Pretty, huh.

And here's a pic of them closer.    All those red beans hanging on the trellis are really pretty.

The trick is to pick them before they get soft and lumpy looking.   The problem I have is that they're so pretty and they grow so fast that I forget to cut them soon enough.   They're still tasty when they're fatter, but we like them best when they're around 18 inches long and about the thickness of a pen.

Don't forget to leave some on the plant so you can save seed for next year.    Leave them on until the beans dry up completely - even after a frost.   Then cut them down, take the seeds out of the pod, put them in an envelope and LABEL them so you remember what they are for next year. 

My favorite way to eat long beans is to cut them into pieces a few inches long, the sautee them up with lots of garlic and a bit of butter until they're a bit crispy.  Then toss in a spoonful of Thai red curry paste.   Stir it all around well until the beans are well covered with it.   Enjoy.

Tuesday, August 28, 2012

Mango Chutney - Traditional Style

Last year I made some wonderful peach chutney.  I love it.   Seriously love it. 

I love it over cream cheese on crackers.  I love it even more on brie.   I love it poured over a pork roast and slow roasted for hours until the outsides are crispy.   I love it straight out of the jar with a spoon.

I pretty much thought I was a genius after I made that chutney.   It's some gooood stuff.

I've been thinking about chutneys a lot lately.   Chutneys came from India with strong flavors and textures and heat.   They usually have a fruit base, are heavily sweetened and then the sweet is balanced with vinegar.   I've seen chutneys flavored with cinnamon and cloves, and some with ginger, garlic and mustard.   I've seen chutneys heavy on the heat - with loads of red pepper flakes and some with just a whisper of heat.

In all my reading, the consensus is that a lot of traditional chutneys were made with mango and lime.  Heavy on citrus overtones. Spiced with cinnamon and cloves, with lots of heat.   So I thought I'd play around.

The first thing I decided was that it needed heat, but not heavy heat.    I was thinking more along the lines of cat-in-your-lap kind of heat and not the white hot heat of a thousand suns.    I realize that right off the bat I've deviated from the traditional, but no one at my house would eat it if it is too hot.   We're pepper wimps. 

For citrus, I used the zest and juice of a lime, plus some lemon and orange juice for flavor. 

I used loads of garlic and an onion.

For spice, I used candied ginger, and cinnamon and cloves.  And for the sweet, I opted for brown sugar.  

I used white wine vinegar, because it's my own and I much prefer it over the apple cider vinegar that the vast majority of chutney recipes call for.   I used regular raisins instead of the golden ones that are traditional because that's what I had.    If you want to use golden raisins and cider vinegar instead, then go for it.   I'm sure it will be delicious.

One of the things I like best about chutneys is that they are a slow food.  

Slow.  Food.

You put it in a pot, heat it all together and the cook it until the flavors are melded and the color is dark and mysterious and delicious.   Take your time. 

Mango Chutney
  • 4 cups of mangoes, peeled and chopped [about 3 large mangoes]
  • zest and juice of 1 lime
  • juice of 1 lemon
  • juice of 1 orange or 2 clementines
  • 4 cloves of garlic, minced
  • 1 onion, chopped finely
  • 1/4 cup finely chopped candied ginger
  • 1/2 cup raisins
  • 2 cups brown sugar
  • 1 cup white wine vinegar
  • 1 Tablespoon mustard seed
  • 1/4 teaspoon red pepper flakes
  • 1/2 teaspoon cinnamon
  • 1/4 teaspoon cloves
Put everything into a large pot and cook it down.   Start it on medium until you read a boil, then lower the heat and let it simmer until it's the consistency you want.    It'll be good and thick if you let it cook down until when you scrape a spatula across the bottom of the pan, it leaves an empty space behind it for a couple of seconds before the juices crowd in again.  

When you're happy with it, ladle it into jars and process for canning.  Makes 3 pints.

Note:  Thick is in the eye of the beholder.    If it ends up runnier than you wanted, then use it over meat.   It's probably my favorite way to eat chutney.

To use it on meat, brown and season the meat with salt and pepper, then transfer it to an oven safe pot or pan.  Pour the whole pint of chutney over it and cook it uncovered at 300 degrees until your meat falls apart.   Delicious! 

Monday, August 27, 2012

Basil

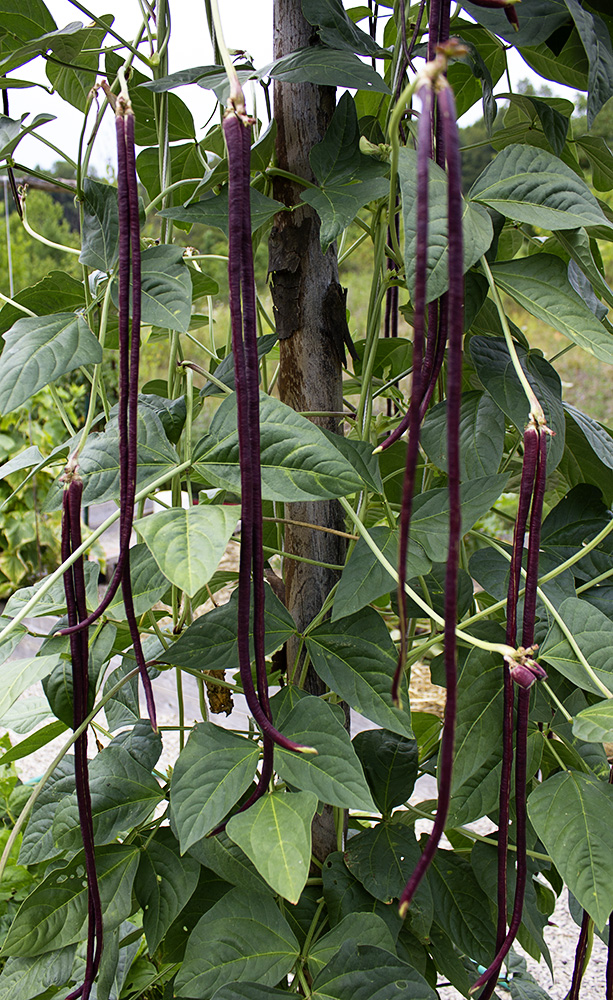
I kind of overdid it on the basil this year.   Last year I only planted one row and it didn't do great.  This year I planted three and it turns out that basil loved the heat and the daily watering.   I have loads of basil.

Loads, I tell you.

This is a pic of our second picking, but we've done one more since.   I expect at least one more before frost.    That's a seven gallon tote that it's in.   That's a lot of basil.

There will be plenty of pesto in the freezer this year.   Here's a link to how I make the pesto.

In the tote there, I have Italian Sweet Basil, and Opal Basil and some Thai Lemon Basil.     It's easy to find seeds for those at your local hardware type store.  

This year, since I planted basil all over the place, I learned a few more things about what it likes.  
  • Basil likes heat and wet and well drained.   It loves very sandy soil.  
  • If you direct sow the seeds, then make sure to water them every day to keep them damp until they sprout.    It's true.   If you don't water them, they probably won't sprout and if they do sprout, then it'll take a couple of weeks or more before you see them.   If you do water them every day, then they come up in just a few days.  [Note, this is only true if you have very well drained soil.  If you have heavy wet soil, then the rules are completely different.  My advice is to dig a lot of sand in.]
  • Basil much prefers soil that has some manure in it.    The leaves and plants are much bigger in the beds where I turned in some manure this year.  
  • Don't bother planting basil early in the season.   It turns brown if the temp gets below 40 and then it will be forever stunted.  For. Ever.   Wait until the middle of June to plant it and you'll still have plenty of time to make loads of pesto all season.   I planted the last batch of seeds at the beginning of July and I'll still get three harvests.
  • When I cut the basil, I cut it just above the bottom sets of leaves. After it's cut, the plant will branch off at the base of those leaves and produce another nice harvest for you. 


Sunday, August 26, 2012

Red Raspberry Jam


It's the end of August.  

August.

August, August, August.   

Wasn't it just February?    Where did the year go??   Seriously.   Stop the calendar, I want to get off.  

This is the craziest time of the year for us.   Co-ops starting, fiber festivals and art fairs, holiday art fairs to get ready for, the garden producing like crazy, etc., etc., etc.  Run, run, run.

Which is a convoluted way of saying that I forgot to give you the recipe for the red raspberry jam that I used in the layer jams yesterday.   

I'm sorry.   It's hard to make jam if you don't have the recipe.  

And you should definitely make this jam. 

Here it is. 

Red Raspberry Jam
  • 4 cups red raspberries
  • 2 cups water
  • 3 Tablespoons Dutch Jell All Natural Lite Pectin
  • 2 cups sugar
Mix the raspberries, water and pectin in a large pot.   Bring to hard rolling boil, stirring constantly.  Boil hard for 1 minute.    Add sugar.  Stir well and bring back to hard rolling boil, stirring constantly.   Boil hard for 1 minute.   Ladle into jars.  Yield 2.5 pints.

Saturday, August 25, 2012

Layered Jam

So yesterday i SHOWED YOU....WAIT A SECOND.....there....the caps lock got hit...

I hate caps.   For years I didn't use them at all.   I didn't miss them.   I use them now because it's more normal.    And easier for a lot of people to read.   And less distracting for those of you out there who get upset at missing caps and grammar errors and typos.    I'm not big on typos, either.   So I understnad.   Understand.  

Damn typos. 

Jam. 

I'm here to talk about jam.  Focus, Robin.

Jam.  

Lovely layered jams.    Interesting idea, isn't it!   I thought they'd be so pretty as gifts.   So I made a red and white layered jam to celebrate both of my alma maters.  Almae materae?  But I only have one alma, so .... hmmm. I can't remember the Latin plural right now, alma something, so if you know, help me out in the comments.

At any rate, I graduated from the University of Utah and then went to grad school at Indiana University. [Latin was not my major.]  The colors at both schools are red and white.  

Red and white layered jams!

Brilliant! 

For homecoming weekend.   

Or the superbowl.  Not that college teams play in the superbowl, but it's the whole team color thing expanded. 

Or wedding showers, in the wedding colors.  Because weddings need team colors, too.

Or Harry Potter parties.   It's Gryffindor jam!  Quidditch team colors!  The mind reels at the possibilities. 

I layered red raspberry jam with white nectarine jam in these jars.   It's easy.  Make your jams separately and let them cool for an hour and a half or so.   Then  alternate 1/4 - 1/3 of a cup of each jam in an 8oz jelly jar.  

Nota Bene [This is Latin for PAY ATTENTION!]:   You won't be able to process these for canning without messing up the layers.  I tried.  These jams will have to be refrigerated.   

Friday, August 24, 2012

White Nectarine Jam

Part of my loot from the Sam's produce section was a box of white nectarines.  Nectarines are a hybrid of peaches and plums - Prunus persica var. nucipersica - and are basically a firmer, fuzzless peach.   They're really common here in the midwest and the trick is to let them ripen.   Rock hard nectarines are not delicious.   When they're ripe, the flesh is soft and they smell divine.


Divine, divine, divine.  [Name that movie.  It's about a little girl.]

I had never see white nectarines before and I grabbed a box.  I figured that by the time I got the rest of the stash jammed, the nectarines would be ripe and I'd be able to do something with them.

The next day, the most wonderful fragrance filled the kitchen.   Ethereal.  Floral.  Intoxicating.

It was my box of white nectarines.   I had never smelled anything like that before.   These babies are something special.

They got their very own jam.  With nothing extra added.   And then I made a second batch and layered it with another jam and it looks awesome and I'll show you that tomorrow. 

Here's what you need to know about nectarines.   They are a very low pectin fruit, which means that they don't have a lot of pectin already in them.  If you want thick jam, you have to add a lot of pectin or a lot of sugar or both.   A lot.

Or else you'll have syrup, which isn't a bad thing.  Syrup is awesome!

White Nectarine Jam
  • 4 cups, peeled, pitted and chopped nectarines [about 4 nectarines, if they're big]
  • 1 cup cold water
  • 1/3 cup [rounded] Dutch Jell  All Natural Lite pectin
  • 1 cup sugar
Mix the cold water, pectin and fruit in a pot.   Mix well to dissolve the pectin.  Bring to boil.  Stir constantly until it reaches a hard rolling boil that you can't stir down.   Boil 2 minutes.   Add sugar, stirring well.   Bring back to hard rolling boil.  Boil for 1 minute.  Ladle into jars.  Makes 2 1/2 pints.  

Note:  This is a very low acid fruit.   If you are afraid to can it, then keep it in the fridge. 

Thursday, August 23, 2012

Honey

One of the pleasant consequences of keeping bees is the harvest of honey.   Since this is our first year, we may not get much, but over the summer, as we've had to cut out burr comb and crooked comb, I've saved it.   At one of the inspections early in July, we had to cut out a big piece of crooked honey comb and there was enough honey in that one section to fill this pint jar.  
This honey came from this comb.  You can just see on the right where we cut out that section the week before.  The white in the center section is the capped honey.  The darker area around that is honey that is being collected and fanned down to the right consistency.  The white edges around that is new comb that is just starting to be filled. 

Honey facts:   
  • A pint jar holds 24 oz of honey, but only 16 oz of water.   Honey is heavier.  
  • Honey is also sweeter than sugar because it's more condensed.  Use only 2/3 - 3/4 as much honey as sugar when you substitute in a recipe.  
  • The bees cap the honey because it has less water in it than the air.  The wax cappings keep the honey from absorbing humidity from the air.   
  • Abandoned comb will eventually fail and the honey will reabsorb humidity from the air, then ferment and leak all over everything.  This is just one of the reasons that you should pay to have someone remove a hive from your home, and not just kill the bees.   If there is any honey comb left in your walls, it will eventually leak and you'll have a real mess on your hands - and head.

Wednesday, August 22, 2012

Eggplant Flower


Here's one of the flowers on the Rosa Bianca eggplant.   The fruit will be a soft lavender pink and round as a softball.    K2 is sure that the pink ones will taste better than the regular purple ones. 

I think eggplant flowers are some of the prettiest things in the veg garden.

Tuesday, August 21, 2012

Apricot Anise Hyssop Jam

I scored some awesome fruit a couple of weeks ago at Sam's.   Among the treasures we brought home was a big box of Black Velvet apricots.   The sign said they were a plum-apricot hybrid, but I think they're mostly apricot.

They have a soft golden flesh with that distinctive apricot texture and fragrance, but they are a gorgeous dark red velvet on the outside.  

Beautiful.

Gorgeous.

And tasty.

I paired this luscious fruit with the anise hyssop simple syrup that I made.    It was a match made in heaven.  

Apricot Anise Hyssop Jam
  • 4 cups peeled, pitted and chopped apricots [about 18 apricots]
  • 1 cup cold water
  • 1/3 cup [rounded] Dutch All Natural Jell Lite pectin
  • 1 cup sugar
  • 1/2 cup anise hyssop simple syrup
Combine the apricots and water in a pot with the pectin.   Stir well to dissolve the pectin and heat to a boil.   Stir constantly until it reaches a full rolling boil that you can't stir down.   Boil hard for 5 minutes to boil out some of the water.  Add the sugar and the anise hyssop simple syrup.  Stir well and return it to a hard boil.  Boil 1 minute.  Ladle into jars.  Process for canning.   Makes 2 1/2- 3 pints. 

Notes:   If you're not afraid of the anise flavor, then double the syrup and put in a full cup.   Yum. 

Monday, August 20, 2012

Misty August Mornings

This is the season of change.    The heat has subsided a bit and the nights are cool.    We've had fires in the firepit and cooked our breakfast crepes on the grate over the firepit while cradling hot cups of chai and chocolate.


It is a blessed relief from the firey heat of summer. Now we pray for rain.

Lots of rain.

Lily got these pics one lovely cool morning. 

The spiders have been busy.   The webs with the zigzags are made by the Argiope. 


I love the spiral construction of this one.

Sunday, August 19, 2012

Cucumber Tower

It's not really a tower, just vines climbing up some strong twine to the top of a trellis that goes over the center path of the veg garden.

It's happy and covered in bloom.  In the mornings, this thing is full of bees and really noisy.  

This particular variety is De Bourbonne, which are bred to stay small.   Assuming that you go out every day to measure and pick them.  And assuming they don't get lost in all the leaves.  It's easy to miss them and it only takes a day for them to get not small.

Not small as in big.  Really big.

Bottom line:   I like this variety a lot and will be doing them again.

Saturday, August 18, 2012

Double Lemonade Jelly


Sometimes, I like a citrus jelly that isn't quite as over the top as marmalade.  

Don't get me wrong, I love marmalade.   I really love marmalade.   But marmalade is a bit labor intensive. 

Plus, it's hot out.  

Plus, I'm busy.  

Plus, lemonade sounds good. 

Plus I have that lemon verbena simple syrup that I can use in jelly.  

Plus, I have my cute little zester and a couple of lemons hanging around. 

What to do, what to do, what to do....

Double Lemonade Jelly.  

It's lighter, brighter and easier than marmalade,  but just as fun.

Plus, it has those cute little confetti strips of zest in it and I love those!

Double Lemonade Jelly
  • 2 cups cold water
  • zest and juice of 1 lemon
  • 1/3 cup [rounded] Dutch Jell All Natural Lite pectin
  • 1 cup lemon verbena simple syrup
Dissolve the pectin in the cold water in a pot with the lemon juice and zest.  Bring to a boil.  Stir constantly and bring to a full rolling boil that you can't stir down.  Boil hard for 1 minute.  Add the simple syrup.  Bring back to a full rolling boil and boil for one minute.  Ladle into clean dry jars.  Process for canning.   Makes 1 1/2 - 2 pints. 

Notes:  Invest in a zester that you like.   They're not very expensive and they'll save you oodles of time and aggravation.  

You can use more sugar in this recipe if you like.  Try adding 1 cup of white sugar to the recipe if you want it sweeter.

Friday, August 17, 2012

Tardis Supers

A beehive consists of a set of boxes.   The bees use the bottom boxes to put their brood in.  That's called the brood chamber.  They only need a couple of deep boxes or maybe three medium boxes to keep their brood in.

A beekeeper puts extra boxes on top for the bees to fill with honey.  Those boxes are called supers.   The very same type of box can be used as brood chamber or as a super.  The name refers to what the bees use it for. 

The Tardis is a horizontal hive body.   It's the same size as two boxes side by side.   We love that arrangement because when you take the lid off, it's easy to see inside and you can see all of the brood chamber at once without worrying about accidentally killing the queen when you're taking one brood box off the other.  

The Tardis still needs supers though so the bees don't feel crowded and so they can collect honey.    If it ever rains here again, we will have a lot of goldenrod and a significant nectar flow.   We have acres of goldenrod that should produce a lot of honey for the bees to overwinter on - if it rains. 

Once the frames in the brood chamber are 80% full, it's time to add supers.   This is what the Tardis looks like with its supers.   

The box on the bottom is all one box.  There are two boxes stacked on top, under the lid.  This gives the bees plenty of space for honey but the smaller boxes will be easier for us to lift.  Honey is heavy!

Here's a closer look at the center entrances.   The bees are loving the extra space to come in and out of.   There is usually a cloud of bees waiting in front.  This is a very busy hive. 

Notice they like the left one better.  It's the original one. 

Thursday, August 16, 2012

Mango Bay Lime Jam


The mangoes are still beautiful and I've got a lot of simple herb syrups to use in jam.   It's time to use them together. 

Mango Lime Bay Jam sounds like a party in a jar, doesn't it?

Dude. Break out those steel drums!

I used some of my bay syrup to flavor this jam.  All you do is substitute the syrup for some or all of the sugar in the recipe.    Simple.   Just like the syrup.

You can also use bay syrup to flavor your favorite drinks - alcoholic or not.   A spoonful of this stuff in fizzy water will do wonders for your stress level.    I know.

Coming up later in the week, we'll have Double Lemonade Jelly and Apricot Anise Hyssop Jam.

Mango Lime Bay Jam
  • 4 cups chopped and crushed mango
  • 1/2 cup [or more] of cold water so that the mango doesn't stick to the pan when you start heating things up.
  • 4 Tablespoons Dutch Jell All Natural Lite pectin
  • zest of 1 lime
  • 1 cup bay syrup
Combine the mango, water, lime zest and pectin in a pot.  Stir well to dissolve the pectin.   Bring to a boil.  Stir constantly until you have a full rolling boil that you can't stir down.   Stir constantly.  Boil for 5 minutes to boil out some of the extra water.  Add the syrup and return to rolling boil.  Stir constantly.  Boil for 1 minute.  Ladle into jars.  Process for canning.  Makes 2.5 pints.

Wednesday, August 15, 2012

Michigan Fiber Festival

One of my favorite fiber festivals of the year is this weekend! 

It's time for the Michigan Fiber Festival in Allegan, Michigan.

Michigan Fiber Festival 2012 
August  17th -19th

Friday 10-6
Saturday 9-6
Sunday 10-4


Admission is $3 on Friday, $5 on Saturday and Sunday.   I'll be in Booth #130 in Delano Barn.  Stop in and say hello!

I'll have the full array of dyed rovings and yarns.   Let me know if you want me to bring something especially for you!

I have an extra post for you today!  Check out the post below, written by Caleb Warnock on natural yeast.  

Guest Post by Caleb Warnock: Health Benefits of Natural Yeast

Hi, Everyone!   Caleb's book came out this week and we've been experimenting with his yeast.   Natural yeast is very different  from the beasties in the yeast you buy at the store.    We're excited to learn how to use it and as Caleb tells you below, the benefits of natural yeast are numerous and spectacular.   I'll be posting more of our natural yeast experiments in the coming weeks.  

Caleb Warnock is co-author of The Art of Baking with Natural Yeast: Breads, Pancakes, Waffles, Cinnamon Rolls and Muffins (with Melissa Richardson) and author of the national bestseller The Forgotten Skills of Self-Sufficiency Used by the Mormon Pioneers.
© 2012 Caleb Warnock. The contents of this blog post are not in the public domain and may not be used without the express written permission of the author.

Few people realize that the yeast in grocery stores is not a naturally-occurring substance. Laboratory created in 1984, the yeast sold today is so foreign to our digestive systems that some people develop allergies to the yeast itself. This quick-rising yeast appears increasingly connected to the nutritional and digestive disorders that plague so many. Natural yeast flattens the glycemic index, takes away heartburn and acid reflux forever, helps prevent or reverse gluten intolerance and, in some cases, full-blown Celiac’s disease, turns natural phytic acid into an anti-oxidant, controls allergies, and turns flour into a yeast that is both pre-biotic and pro-biotic.

Beyond health benefits, natural yeast is simple to use, costs nothing, tastes wonderful, completely cuts out the need to buy commercial yeast, and drastically reduces the need for baking powder and baking soda. You can easily use it not only to make bread, but also waffles, pancakes, breadsticks, pizza dough, scones, rolls, and even old-fashioned root beer.

Yeast is a single-celled fungus, and the first domesticated living creature in history. Modern science has identified more than 1,000 different varieties of wild yeast. These organisms are so small that hundreds of millions, if not billions, fit into a single teaspoon.
Wild yeast is everywhere -- in the air you breathe, on the bark of trees, on leaves. Ever seen the white film on backyard grapes? That’s wild yeast. The same film can be found of juniper berries. For centuries, both berries have been used as natural “start” for bread yeast.
But not all yeast varieties are the same. For example, the kind of yeast used to make beer is not the same kind of yeast used to make bread. Different natural yeasts have different flavors -- some are strongly sour, some are mildly sour, and some are not sour at all. Natural yeast is sometimes mistakenly referred to as sourdough, but with the right strain of yeast, it doesn’t have to be sour unless that is the flavor you prefer. Some natural yeasts are better are raising bread than others. This is why the best strains of natural yeast has been passed down through generations and communities. Hundreds of people around the nation have gotten free, non-sour natural yeast starts from me.
Until the 19th century, homemade yeast was the only kind there was. In 1857 Louis Pasteur discovered that living organisms -- yeasts -- were responsible for fermentation. Yeast was already an important business, even though no one had understood how it worked. The production of commercial yeast began in France in the 1850s. In the U.S., compressed yeast cakes were introduced to the nation at Philadelphia’s Centennial Exposition in 1876 , which drew 10 million visitors. When America entered World War II, yeast companies developed dry yeast for the military which did not require refrigeration. And then in 1984, rapid-rising yeast was invented in U.S. laboratories.
Today that yeast has all but replaced natural yeast. But not everyone is convinced that the convenience of super-fast yeast outweighs the health benefits of the slow rising process of natural yeast.

A word of caution. If you type “sourdough starter” into Google, you will get hundreds of recipes for starting “sourdough” from commercial yeast. But very little grocery store yeast is now true natural yeast. The best way to get real natural yeast is from someone using a documented strain. The author, Caleb Warnock, mails flakes of natural “sweet” yeast to anyone who requests them at no charge, along with instructions for growing out the yeast. And once you have a start of natural yeast, you can have it for the rest of your life. You can dry it, freeze it, keep it in the fridge, or grow it on your kitchen counter. To get a start of the author’s documented 200-year-old strain of natural yeast, send an email to calebwarnock.yahoo.com.
Here is the link to my blog, and you can click on the cover of the new cookbook to look inside the book. Not to press my luck, but if you order two copies, the shipping is FREE!  CalebWarnock.blogspot.com

Tuesday, August 14, 2012

Simple Syrups in Jam

Here's the thing about summer.  It's busy.  Crazy, stupid busy.

There's no such thing as summer vacation around here.   We have the mowing and the garden and the berries and the mowing and the building and the working and the mowing and the garden and the canning and the jams and the garden and the herbs and the mowing and ....

You get the idea. 

Anise hyssop
I get all these great herbs just at the wrong time for me to do anything with them.  The herbs are ready in June and July and I may not have time to make jam with them until maybe six weeks later.   
They don't do so well in the fridge for six weeks.   Or in a vase.   I could dry them, but that's a lot of work itself and somehow things just taste better if you can use the fresh herbs.  


Lemon verbena
And so here's the thing about herbs for jam.    You can capture that fresh flavor and hang onto it for a few months by making simple syrups with the herbs.   You can water or steam bath the syrup in jars to seal it up and then you can use it in January if you want to and it will still be fabulous.  


Bay
I made three kinds of simple syrup this year:  anise hyssop, lemon verbena and bay.   I made jam with each of them and you are going to love it! 

But first, I need to tell you how I made the simple syrups.

It's simple.   That's why they're called simple syrups. 

Simple Herb Syrups
  • 1 cup water
  • 1 cup sugar
  • 1 cup herb leaves
Combine everything in a small pot.  Stir until the sugar is dissolved. Bring to a boil. Strain the herbs out.  Put in a jar and seal if you want to keep it indefinitely.   These will keep nicely on your counter for a few days, or in the fridge for a few weeks if you don't want to seal them. 

They're so pretty!

Here's the bonus!  

You can use these to flavor all kinds of stuff, like cakes and pies and trifles and as meat glazes or over fruit in tarts.   Yep. 

You can use them straight over ice cream or in drinks, too. 


Monday, August 13, 2012

Queen Anne's Lace Jelly

Flower jellies are a little magical.

I'm convinced that if you eat enough, you'll get magical powers.

Or at least a little box of fairy dust.

I could totally use some fairy dust.

I'd use it to get rid of all the spiders that hang out in the studio.   Not that I mind them, there are just so many.    It's annoying. 

I probably shouldn't talk about spiders.

Sorry.

Where was I   ....   fairy dust.

I'd also use it to magically file the huge pile of papers that accumulates next to my desk and which the cat periodically knocks onto the floor out of sport.   Or spite.  She gets that look in her eye.

And I'd totally use it to do the dishes.   A couple of times a day at least because we don't have a dishwasher, or room to put one.  Maybe I ought to just fairy dust some space for a dishwasher and let Eric take care of the dishwasher itself.   Yeah, that'd work.  

Anyway.

The first thing you need to know about Queen Anne's Lace is its Latin name:  Daucus carota.  Carota as in carrot.  This plant is where we get our modern day carrots from.    Cool, huh.

It's wild around here and will positively take over everything if we let it.   Queen Anne's Lace is 2-3 feet high and has a hairy or rough stem.   The stem is sort of wiry, not hollow.  There is often a tiny dark purple floret in the center of the larger flower.  

This is important!   Make sure you know that what you are picking really is Queen Anne's Lace and not something that will poison you.    Queen Anne's Lace is very very safe, but Water Hemlock is deadly.    They are similar, not identical so make sure you're confident that what you've got is really Queen Anne's Lace.

Once you're sure then pick a quart jar full of flowers.   Pack them in.   Pack them in again.   The more flowers, the more flavor.

I did not wash them first.  The water will be strained and boiled later.  

Fill the jar full of hot water and let it sit overnight.   

Strain the water through a couple of layers of cheesecloth into a pot.    You'll have about 2.5 - 3 cups of water.   It'll probably be a little pinkish.   Pinkish is good.

Add 1 Tablespoon of lemon juice.

Stir in 3 Tablespoons Dutch Jell All Natural Lite Pectin.

Bring to a hard boil.  Boil hard for one minute.

Add 1 cup sugar OR 1/2 cup honey.

Bring to a hard boil.  Boil hard for one minute.

Ladle into jars and process for canning.   10 minutes for jellies.

Notes:  I made this with sugar and again with honey instead.  The pinker jelly was made with white sugar.  The jelly with honey is the more orange-y jelly on the right.

The honey gives it a nice, more complex flavor.  The jelly made with sugar has a flavor that reminded us of apples.   Very good!    It will be easy to eat enough of this flower jelly to get my box full of fairy dust. 

Here's the short version.

Queen Anne's Lace Jelly
  • 1 quart Queen Anne's Lace flowers, packed in the jar
  •  water to fill the jar the rest of the way with
  • 1 Tablespoon lemon juice
  • 3 T Dutch Jell All Natural Lite Pectin
  • 1 cup sugar  OR  1/2 cup honey

Fill a quart jar full of flowers.   Pack them in.  Fill the jar with hot water and let sit overnight.  Strain the water through a couple of layers of cheesecloth into a pot.  Add lemon juice.  Stir in pectin.  Bring to a hard boil.  Boil hard for one minute. Add sugar OR honey.  Bring to a hard boil.  Boil hard for one minute.   Ladle into jars and process for canning.   10 minutes for jellies.

Sunday, August 12, 2012

Flea Beetles

You may have heard me mention flea beetles before.   They attack my eggplants and radishes.

They like fleshy leaves and they leave tiny holes all over them.    They don't eat much, but it stresses the plant and a whole lot of them not eating much can really add up.

I finally got a pic of the little beasts.   The ones that like my eggplant are black and those are the ones in the pic.   Click on the pics to biggify and get a good look at the flea beetles.

Please note: The ones on my radishes were shiny and bronze colored.  Those are Bronze Lundy flea beetles.

There are two ways to defeat them:

1.  Pick them off and drop them in warm soapy water.  You gotta be quick, but it doesn't take long before you get good at it.

2.  Sprinkle on some diatomaceous earth.  It'll dry the beetles out and eventually kill them.   Be generous with the dusting and dust all around the plants, too.   Re-apply after rain.

Saturday, August 11, 2012

Towels!

I've been busy weaving towels this summer.   I love weaving towels.   They're beautiful and useful and beautiful.   How you not love working on something this gorgeous?

Here are pics of the ones I finished recently.  They're all on Etsy.  $20 each.  They're about 16x24 inches.  They've already been machine washed and dried.   100% cotton.

They're made to work, so don't feel like you have to be dainty with them - this is what I use at home every day.

Autumn Squares


Misty Morning Squares


Gold Party


Eggplant 


Red Party


Dk Teal 

Related Posts Plugin for WordPress, Blogger...