Friday, November 30, 2012

Rolls made with Natural Yeast

I discovered accidentally that our natural yeast much prefers hot water/liquid to get a very high rise.   I was happy to see this because our bread has been delicious but a bit dense.    I wanted to be able to control the rise a bit better.  

So when I made these rolls for Thanksgiving, I scalded the milk and melted the butter in the microwave until they were hot.   HOT!    And I poured it right in on top of the yeast with the flour and sugar and salt and then I mixed it all.

And the yeast did not die.  

And it rose and rose and rose.

And my rolls were light.  

And fluffy.   And delicious!   Yes!!

So.   Remember that:    Your natural yeast start might really like hot liquid.   Try it and find out.  Feed it with hot water and see if it rises better.

Rolls with Natural Yeast
www.rurification.com
  • 1 1/2 cups natural yeast start [whatever's left when you feed your start]
  • 1 1/2 cup milk
  • 1/2 cup butter
  • 1/2 cup sugar
  • 1/2 tsp salt
  • 5 cups white flour
Scald the milk and melt the butter.   It's OK if they're HOT! [Hot as in too hot to put your finger in, but not boiling].    Put the yeast, sugar, salt, butter, milk and flour in your mixer with a dough hook and mix away.    You might need to scrape down the sides.    This was enough flour for the dough to hold together and pull away clean from the sides of the mixer bowl.    The dough holds together well, but is still soft.

Mix until the dough begins to 'windowpane'.  [Stretch a bit of dough between your fingers to make a square.   It should get thin before it breaks.  That means the gluten is developed.]

Put in a greased bowl, cover and let rise in a warm place until double.  [I let mine rise in the oven with the light on.]  It took mine almost three hours to double.  [That's the proofing stage.]  After the proofing, pinch off pieces of dough the size you need for rolls, roll them into balls and put them in baking pans so that they just barely touch.  Cover and let them rise again until double.   It took almost three hours.   When they've risen, uncover them and bake at 375 for 30 minutes or until browned. 

Makes 2 baking pans [8x12] full of rolls.   Would probably make three loaves of bread.

Thursday, November 29, 2012

Wednesday, November 28, 2012

It's Show Time

Our last show of the year is this weekend at the Unitarian Universalist Church in Bloomington, Indiana.    I'll be selling my soap and soap sets, painted silks and hand-dyed handwoven scarves and shawls.   There are a lot of wonderful local artists coming, plus a fabulous cookie walk and a homemade gourmet baked goods and goodies sale.  Plus soups and sandwiches.  Plus a white elephant sale.   It's a lot of fun.   Stop in and say hello! 

Holiday Art Fair and Bazaar
Fri, November 30, 2012, 10am-7pm
Sat, December  1, 2012, 9am-5pm
Corner of Fee Lane and the bypass, Bloomington, Indiana


Here's the official flier.   Check the edges of the ad below for the list of artists who are coming.  Click to biggify.


Tuesday, November 27, 2012

Wood Cookstoves

Dear Santa,

I've been worried about surviving a wintertime zombie apocalypse.  You know, or even just a blizzard.  Or an ice storm.     I'm not so big on the whole hypothermia thing. 

I'd be happy with any of these!  [You can get them from Lehman's]

Pretty please?
R


1.   By  AGA, of course.   Artisan wood-burning stove.

Price tag:  $9000

And how cute is this kitchen! 


2.  The Sweetheart wood cookstove.

Price tag:   $5700

It comes in several colors:  White, black, almond, green, blue.


3.  The Baker's Oven wood/heat cookstove

Price tag:  $2695

Extremely practical and downright thrifty compared to the other two.  This is designed for smaller spaces and has a dual function of heat and cooking.   It's not nearly as big as the others, but does have both a cooktop and an oven for emergency cooking.

Monday, November 26, 2012

Garlic Chive Seeds

This is why the garlic chives spread so well.   Blow the pic up to see how gorgeous these seed heads are.   And notice the number of seeds.

We started out with one plant. 

One.

Now they're trying to take over.   

I'm kinda happy about it.

Sunday, November 25, 2012

Dormant Cherry Tree


Remember those cherry trees that Eric bought on sale last summer?    They're doing very well.    The Montmorency got sunburned and dropped its leaves fast this fall, but promptly went dormant and formed these beautiful buds.   

Buds are good. 

These buds hold all the promise of Spring.    We're hoping to get blooms next season. 

Saturday, November 24, 2012

Cold Frame Updates

The cold frames are doing great!  It's hard to get excited about cold frames at first.  They're slow.   For ages, it just looks like more dirt, only covered.   In May, things leap out of the ground.   In November, things creep out of the ground.   That's OK - I'm slower in November, too. 

In cold frame 1,  I have fennel, radishes, cilantro and arugula.  I can't believe how well the fennel is doing.   I should have radishes by Christmas.  I was careful this year not to crowd the seeds.    Last year I had loads of radish greens, but they were too crowded to form radishes.   Thinning the rows when it's 24 degrees outside is not my idea of a good time, so this year I was careful to space the seeds appropriately.   I hope. 


In cold frame 2, which I planted a couple of weeks later, I have a lot of salad greens, plus more radishes and maybe some leeks.   [I planted the leeks directly from seed and I've been reading that they prefer to be sown and babied, then transplanted.   We'll see.]


Friday, November 23, 2012

Frosty Corn

This is something that I have never seen before.   The corn is usually harvested and cut down before the frost.    Since the drought killed the corn early, it was left in the field long after it started frosting.  Now the leaves are down and the corn is still out there.    Slowly it's being cut down - I'm guessing for silage, but I don't know.

Frost on the corn is beautiful.    But I hope I never have to see it again. 


Thursday, November 22, 2012

Cedar and Rosehips

Happy Thanksgiving! 

These are rosehips of our wild multiflora roses. That's the native red cedar in the background.  I liked these colors and textures together and thought you might, too.  They make great decorations!


Wednesday, November 21, 2012

Solsberry Bog Puddings


While I was making those individual Sussex Pond Puddings, I thought I'd really put a Hoosier twist to it and make some with other fillings.    They were wonderful!


There's not enough goo in these to call them Pond Puddings, so I think we need to adjust the name.   We considered these names:
  • Solsberry Wetland Puddings
  • Solsberry Drought Puddings
  • Solsberry Marsh Puddings
  • Solsberry Bog Puddings
  • Solsberry Puddle Puddings
I'm leaning toward Solsberry Bog Puddings.   These puddings are soft and boggy, not runny.  Plus, there's a real bog with a beaver pond next to it a mile or so west of us, so it fits where we live, too.   Vote for your favorite name in the comments!

Pastry [Enough for 3 individual puddings]
  • 1/2 cup flour
  • 1/2 cup fine bread crumbs
  • 1/2 tsp salt
  • 1/2 cup butter or shortening
  • 1/3 cup milk + a Tablespoon or so
Combine the flour, bread crumbs and salt.  Cut in the butter or shortening until fine.   Add milk.  Stir together to form dough.   It will be soft.  

Divide dough into thirds.    Roll each into a round disk about 1/4 inch thick.   Cut out one quarter of the dough to save for the top.   Fit the rest of the dough into a cone shape and press it into the cup or ramekin.  Trim off excess dough and keep it for the top.   Fill the puddings.

Roll or press the remaining dough into circles for the tops of the puddings.   Seal, etc. as described here:  Sussex Pond Puddings - Hoosier Style 

Filling:
For our version of the puddings, all you have to do is choose a fruit, then choose a sweetener.   This is a great way to use up leftover bits of fruit and an even better way to use that jam you've been making all year.  This is definitely one of my favorite TTDWAJOJ.   [Things To Do With A Jar Of Jam].

For the fruit, we used bananas, lemons, peaches from a can, and apples.  You can use any kind of fruit, fresh or canned. 

For the sweet, we used brown sugar, maple syrup, apple-pear maple jam, strawberry rhubarb jam and orange marmalade.  You could also use honey, white sugar, turbinado sugar, agave, etc.   These were really good!   Here are the combinations we used.

Lemon and brown sugar.   This is very close to the traditional Sussex Pond Pudding recipe I told you about before. 1/2 lemon per ramekin.  Three tablespoons brown sugar.   Plus the butter.

Lemon and marmalade.  1/2 lemon per ramekin.   Two generous spoonfuls of marmalade that hadn't jelled right.  Plus the butter.  Loved this one!!  

Banana and brown sugar.   Like Bananas Foster without the booze.  One medium banana sliced per ramekin.  2 Tablespoons brown sugar.  Plus the butter.    To. Die. For.  

Peach and Strawberry-Rhubarb Jam.   I used sliced peaches out of a can to see if it would work.   Oh, it worked!  Let the juice drip off a bit before you put the peaches in the pastry.    You could also slice up a fresh peach, of course.  Two generous spoonfuls of jam.  Plus the butter. 

Apples and maple syrup.   About a quarter of a large apple cut up fit into a ramekin if you piled it in.  Since apples shrink a lot during cooking, I piled high.    Two tablespoons of maple syrup.   This was a huge favorite.

Apples and Apple-Pear Maple Jam.   About a quarter of a large apple cut up.  Two generous spoonfuls of jam.  Plus the butter.   Wonderful!

Don't be afraid to mix and match your fruit and jam.   Just because you're using peaches doesn't mean you need to use a peach jam.   Be bold.

Enjoy! 

Tuesday, November 20, 2012

November Bees

November bees are quiet.

Too quiet.

Which is really weird, because normally, bees are pretty darn noisy.    Most of the time, when they are 'quiet', they sound like a fan.   This time of year they are quiet as in 'silent'. 

I went up to look at the hives the other day and not a creature was stirring.  It's been in the 40s during the day lately, and below freezing every night.  

No bees in the Tardis window at all.  They've clustered where I can't see them at all. 

Part of me wanted to open things up to make sure they're all right, but disturbing them would mean they'd use up more energy and need more stores.    I want them to get through the winter without a candy board if they can, so I left them alone. 

Quiet. 

Silent. 

Notice the yellowish brown streaks on the front of the Tardis on the top left side under the lid?    It's bee poo - from cleansing flights.  They won't poo in the hive, but it's cold outside, so they leaned over the edge of the entrance.   There have only been one or two of these new ones when I go up there, and the last few appeared after a couple of surprise days in the low 70's so I don't think it's Nosema
 
Nosema is a fungal infection of the bee gut.  It causes bee dysentery, which is dark brown.   If the colony were infected, there would probably be a lot more of it - all over the hive.  As it is, these few streaks are located just under the openings in the inner covers, under the top cover.  

I wish they'd use toilet paper. 

And dispose of it neatly. 

Really.   Were they raised in a barn?

Monday, November 19, 2012

I'm Dreaming of a Bread Oven

We saw this awesome bread oven in use at Fort Ouiatenon this year.   Those girls were leaning against it because it was warm.


They were indeed baking bread inside it.


Awesome.

As in, inspiring awe and wonder and a deep recognition that This Is The One.

I love this bread oven.  

I LOVE it, I tell you!

Here's the front. It was about 4' wide.  


They built a fire in the right chamber [You can see the smoke marks, above] and let it heat up good, then they moved the coals to the left chamber and let them burn out. 

The left chamber is wide enough to use one of those fireplace shovels, with an extra long handle,  to move the coals from the right to the left. 


Once the right chamber is good and hot and then emptied out, they baked bread in it.    It was hard to get a pic of the inside, but this will give you the idea.   They were taking one loaf out and you can just see two more inside.  


The whole thing was probably 6' long.  It had a chimney at the back, that came up to about 5' tall.  They said it was made of fire brick covered with concrete.   It had a crack over the left chamber, but still heated fine.   They made a lot of bread that day with it.

We don't need one this big, but this is the way we want it to look.    I'm thinking we only need it around 4' deep, with a narrower chimney on the back.   I love the hearth and the double chamber.   Ours will be built right next to a firepit, and we won't be baking all day long, so in theory, we won't need the left chamber, we can just pull the coals and light a fire in the firepit with them.   That way we get to enjoy the oven and watch a fire. 

Sunday, November 18, 2012

Sussex Pond Puddings - Hoosier Style

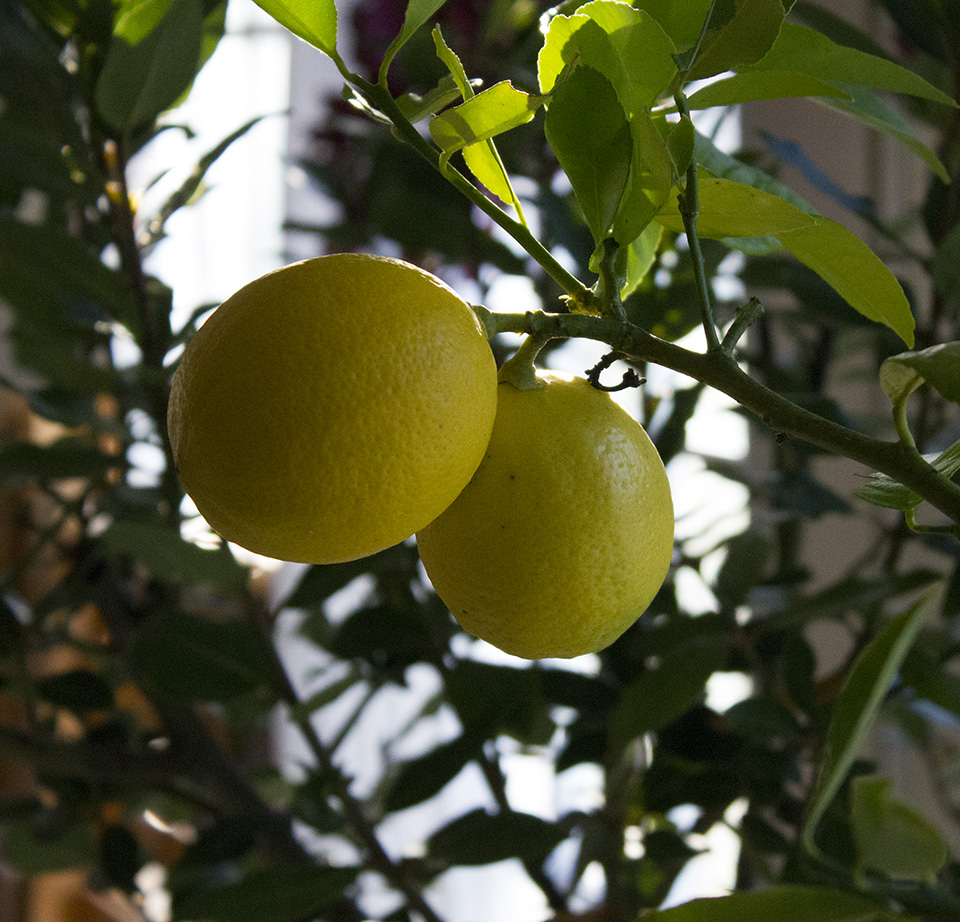
So, you know I had those two lemons that grew on my Meyer lemon tree.   A commenter suggested that I make Sussex Pond Puddings with them.   Since I'd never heard of them, I went looking and found this site with a great recipe for them.   The English Kitchen.  Fabu site, by the way.

Basically, Sussex Pond Pudding is a steamed pudding with a suet-type crust that is filled with butter, sugar and a whole lemon, then steamed for hours until the lemon is cooked.   The 'pond' is the melted filling that spills out when you open the pudding.  

The English Kitchen's recipe was in grams and called for suet.   Suet just isn't going to happen here, so I converted everything to cups and tried the recipe with butter and again with shortening instead of the suet in the crust. 

I had never made steamed pudding before, so this was all new territory.   I admit that I cut down on the butter in the filling because my arteries were slamming shut just thinking about all of the butter in this dish.  Also, I made individual puddings so we could play with different fillings.  [More on those later]. Finally, I steamed them in the oven instead of the stovetop because the individual ones wouldn't all fit in one pan. 


The dough was easy to make and easy to handle.   Cut out one quarter and save it for the top.   It's easy to press into shape for the top.


Press the rest into the ramekins.


Then fill and cover with the rest of the dough.  I ended up sealing the edges with a fork. 


Cover with parchment paper and tie it down.   Notice the pleats in the center.   I don't know if they worked, but that's the traditional way to do it.

I set the ramekins in a large baking pan, filled it with hot tap water halfway up the sides of the ramekins, put it in the oven at 350 and set the timer for 2 hours.  And then we waited.  

Two hours was a bit long - they got very brown.  Not too brown, but very brown.    I think 1 1/2 hours would be better.  


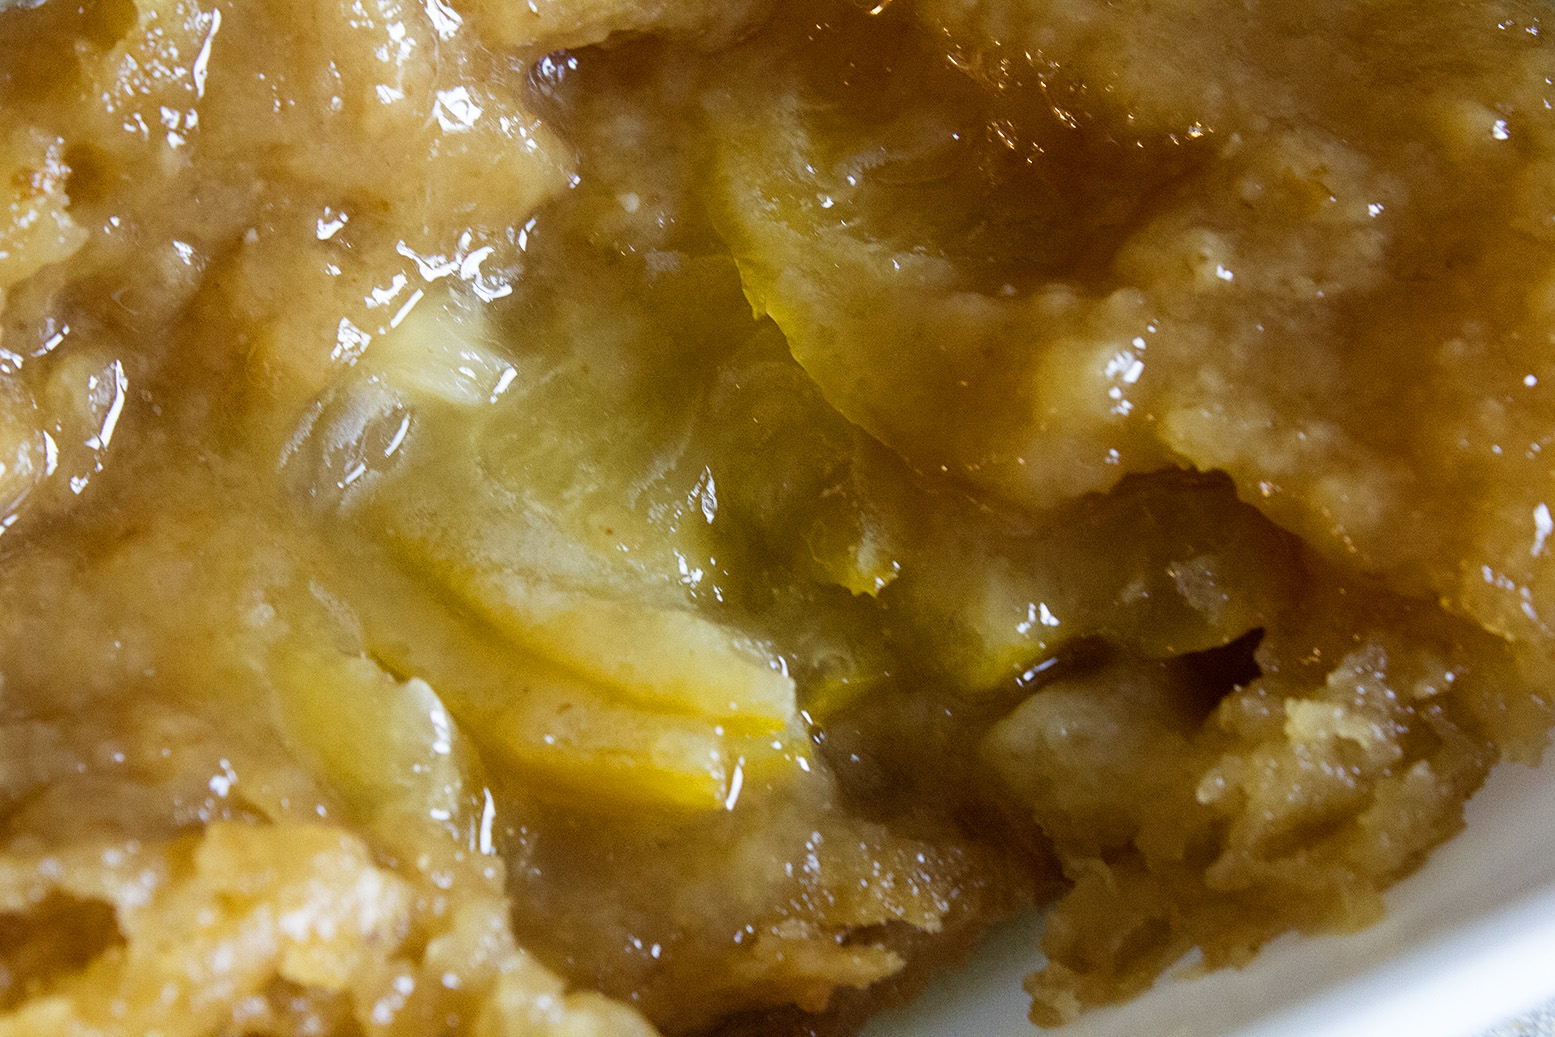
Then I inverted them into bowls and we dug in.

Wow.  


Wow!

Lemony, syrupy, sweet, buttery goodness oozing all over.  

Want to make some? 

You should make some.


Sussex Pond Pudding - Hoosier Style
www.rurification.com

Pastry  [Enough for three individual puddings or one large one.]
  • 1/2 cup flour
  • 1/2 cup fine bread crumbs
  • 1/2 tsp salt
  • 1/2 cup butter or shortening
  • 1/3 cup milk + a Tablespoon or so.
Combine the flour, bread crumbs and salt.  Cut in the butter or shortening until fine.   Add milk.  Stir together to form dough.   It will be soft.   

Divide dough into thirds.    Roll each into a round disk about 1/4 inch thick.   Cut out one quarter of the dough to save for the top.   Fit the rest of the dough into a cone shape and press it into the cup or ramekin.  Trim off excess dough and keep it for the top.   Fill the puddings.

Roll or press the remaining dough into circles for the tops of the puddings.   Seal, etc. as below.  

Filling for individual puddings:  
  • 1/2 lemon per individual pudding, sliced thinly
  • 1 1/2 Tablespoons butter, divided into thirds
  • 3 Tablespoons brown sugar
In the bottom of the pastry-lined ramekin, put 1 Tablespoon of butter and 1Tablespoon of brown sugar.  Stack the lemon slices and top with 2 Tablespoons brown sugar and 1/2 Tablespoon butter.  Cover with pastry.  Seal edges.   Cover with parchment paper and tie it down.  

Heat oven to 350 degrees.  Place puddings in large baking pan and fill with water until it comes halfway up the ramekins.   Bake for 1 1/2 hours or until brown on top. 

When done, remove parchment paper, slide a knife around the edge to make sure it's loose and invert the pudding onto a plate or bowl.    Don't let them cool too much or the bottom sticks.   If you need to make these ahead, then when you're ready to serve, microwave them to warm them up [hot!] so that the bottom will come out of the cup.  

These are great with cream.

Saturday, November 17, 2012

Dirt

Half of one hole, about half finished
I feel like I've been living in a hole lately.

After 30 hours of digging with the backhoe,  we've been finessing the holes to just the right shape and levelness.   I figure it took another 30 hours or so with a shovel. 

All of us.

It's exhausting.

It's dirty. 

Here's the thing about dirt.  Dirt is dirty.   It makes everything around it dirty, too.

Like my boots.

And my pants.

And my hair.

The kids.  The pets.

The grass around the house.   I hate dirty grass.   

The back room floor where we keep our boots.

It is unglamorous.   Personally, I don't think the Beverly Hillbillies look suits anyone.   We've been looking like that a lot lately.   So has the house. 

It's really, really hard work.    And here's the thing about that.   I'm not all that big on getting exercise via hard physical workouts - I prefer long walks.  I'm not a 'work out at the health club' type of person.   But if I am going to work out that hard for that long, until my joints and muscles scream in pain, and then sustain that level of activity for 10, ten!, hours, then, by golly, I want something to show for it.   Something like a nice big hole. 

I look at those holes and there is a part of me that is so proud of them, I could burst.  

Friday, November 16, 2012

Frosty Leaves

It's the little crystals sticking up off the sparkling edges that get me every time. 

Every.  Time.  

Thursday, November 15, 2012

Ruffle Scarves

I've been playing around with ruffles in my weaving.   

You weave them flat.

Then wet finish them.

Then you have ruffles!

I heart ruffles!
If you didn't see these in person at the BSWG Show and Sale last weekend, then you can come and get  one at my next show! 

Unitarian Church Art Fair and Bazaar
Fri, November 30, 2011, 10am-7pm
Sat, December  1, 2011, 9am-5pm
Corner of Fee Lane and the bypass, Bloomington, Indiana

Wednesday, November 14, 2012

Sunset

Not a brilliantly colored sunset, but dramatic, nonetheless.

Tuesday, November 13, 2012

Frosty Clematis

This is clematis 'Niobe'.   She grows on a trellis in front of my studio.    This was a hard summer for her, but with some extra watering and the shade on her roots, she made it.   When the weather cooled off, she started blooming again and is still in bloom - even through the frosts!


Monday, November 12, 2012

Foundation

We're digging big holes so we can address some foundation issues.

'Issues' is another word for 'problems'.

Our foundation has big issues.

This means our foundation has big problems. 

Big.  Problems. 

Like no drainage.   So much moisture was being held in the clay soil around the foundation that after we dug out the foundation, the soil under the house started/continued leaching out.  

Moisture is a bad thing.


And don't you love these cracks?

Oh, wait.  Those aren't cracks.  That's where there's just no mortar between the blocks.

Oops. 

Then there's the footer.   The footer  should be 8-10 inches thick.  This footer is thick enough.

But it's not deep enough under ground.  It should be below the frost line.  Our frost line is 30 inches down.  

Oops.


Then there's this little beauty.    A footer that's only 4 inches thick.    Sitting at 4 inches below the soil.

The surprise on the other side of this area of the house was that there was no footer at all.

None.  

Which is why we're fixing things.  

Sunday, November 11, 2012

Ripe Lemons

I have a lemon tree that I've been babying for a couple of years. 

It bloomed.

It produced a lot of tiny green lemons.

All of them fell off except the two at the very tippy top.

As they got bigger, the top tipped.

They stayed green forever.  For.  Ever.

They finally turned yellow.

Now I'm trying to decide what to do with them.

Suggestions?

Saturday, November 10, 2012

A Couple of Fall Color Shots

The leaves came down too quickly this year.   What leaves we had left were unceremoniously ripped off the trees by the spectacular winds feeding hurricane Sandy.   

No kidding.   Here in southern Indiana, we were part of that storm when it hit land.   Holy awesomeness of nature, Batman.  

At any rate, I was not ready for October to go, so I saved these for today.    
The lower red in the picture above is sumac - probably smooth, but could be staghorn sumac.   The bees love it and it's so gorgeous when it turns in the fall.  

Seriously, we live in a beautiful place. 

This is the road to our cemetery.   I love that little dip and jog.  Our old roads dance through the hills. 


Friday, November 9, 2012

Putting Up Squash

I canned my squash harvest this year against FDA recommendations.   Here's the FDA page if you want to look at it.  They don't even want you to can it with a pressure canner.

Note:  The FDA has recommendations for canning meat here.  

So, just to be clear, the FDA does think it's safe to pressure can meat, but not pumpkin.

[Eyebrow raised.]

I pressure canned my squash anyway.    I roasted it, did not puree it, packed it in quart jars, and filled it up with water leaving an inch headspace.   Then I processed it at 10 pounds of pressure for 80 minutes - just what the book for my canner recommended.  It's an old book that came with my canner, lo those many years ago when my mom bought it.

Note:   The processing called for on the FDA meat page link above, for raw chicken with bones is 10 pounds of pressure for 75 minutes.   Raw.  Chicken

I think I'm safe.

If I had an extra freezer, I'd freeze it but freezer space is at a premium.

Also,  things get lost in the freezer.  They go in and are never seen again, like agents going into the Escher Vault in Warehouse 13.    Mysterious dark forces are at work in there.   I just know it.  

Also, freezers are vulnerable to power outages.  It's a bad feeling knowing that the contents of your freezer are slowly thawing out and that every time you open it to try to use some up before it goes bad you're just hastening the inevitable.

So,  I'm trying to can more and freeze less.   Or at least freeze only things that I can easily and safely bottle up in a water bath canner over an open fire if I had to --- like fruit.  

UPDATE:  All of that pumpkin was delicious.   A current search [3/25/14] shows that the USDA now says it's perfectly fine to pressure can pumpkin in cubes now: http://nchfp.uga.edu/how/can_04/pumpkin_winter_squash.html
After you process them, they often fall apart and look just like puree.


Thursday, November 8, 2012

Tendrils


The tendrils that grow
on squash vines are
some of the
prettiest things
that grow
in the garden.


Don't you think?

Wednesday, November 7, 2012

Cardamom Buns with Natural Yeast

I love my natural yeast.    I've been baking bread with it, trying to get light and fluffy bread instead of heavy and brick-like bread.   

Brick-like bread is good for a lot of things, but not eating.   For example, you can use brick-like bread for a door stop.   Or a weapon.   Or a big paperweight.   Or a mold culture.  Or a window prop.   Or to break into your car if you forget your keys.   Or instead of a clay pigeon. 

I'd just rather have light and fluffy bread.

You know?

I've been playing a lot with the natural yeast and noticed that a lot of recipes call for only 1/2 cup of starter.  That's not enough here.  I kept getting brick bread.  When I feed my start, I take out about 1 1/2 cups of the old starter to make room for the new feed.  One day,  I decided to use all 1 1/2 cups of leftover start in the dough.  What a difference!  I made a batch of light and fluffy cardamom buns that was so good that K2 begged me to make more.   Every. Day. 

So I did. 

Cardamom Buns with Natural Yeast
from www.rurification.com
  • 1 1/2 cups natural yeast start  [or whatever you take out when you feed your start]
  • 2 cups white flour
  • 1 cup milk
  • 1/3 cup sugar
  • 2 tsp cardamom
  • 2 eggs, beaten
  • 2 Tablespoons oil
  • 1 more cup white flour
Mix the natural yeast start, 2 cups of white flour, milk, sugar, cardamom, eggs,  and oil well.  It will be a wet dough.   Put it in a large greased bowl and let it rise to double.   Don't rush it. 

After it has risen the first time, mix in the last cup of flour.   Flour your hands and pull off pieces about 1/2 cup in size and roll them into balls.  Set them in a greased ovenproof pan and let them rise to double.

Bake at 400 for 25 minutes.

These are amazing with honey.   Amazing.   Worth the trip to the store to get some if you don't have it in the pantry. 
Related Posts Plugin for WordPress, Blogger...