Thursday, February 28, 2013

Natural Dye Experiments: Part 2

This is part 2 of the final report from our natural dye experiments.     From top to bottom, the dyes are:

Indigo
Comfrey
Goldenrod
Osage Orange
Walnuts
Apple twigs
Madder
Brazilwood
Cochineal
Logwood

I can never decide if I like them best organized by fiber, or by color.

In the end, I think I like looking at them by color the best.   Of course.

See Part 1 for how we organized the experiments and the full list of fibers, mordants, etc.   The fibers that turned out best for us were: mohair, silk, alpaca, wool and superwash wool.   [Since the wool and alpaca looked pretty much alike, I'm not going to talk about it in this post.   So sorry.]  These were the protein fibers.

The cellulose fibers didn't take the dye very well with the dye methods we were using.   So, First Lesson - plant fibers and animal fibers require different dye methods when using natural dyes.

Dyeing went this way:
  • prep dye
  • pre-mordant fibers and rinse
  • cook in dyebath for at least an hour
  • rinse
  • postmordant and rinse
  • afterbath and rinse.

This is the mohair.   Gorgeous, isn't it.   We loved the way mohair took natural dyes.   The dyes again from left to right are:  indigo, comfrey, goldenrod, osage orange, walnut, apple twigs, madder, brazilwood, cochineal, logwood.


The superwash really took the dye.   Much darker than any of the rest of the fibers we tried.  This is typical of superwash in general.    It does not behave like wool with dye.  Superwash wool is treated so that it doesn't felt as much.     It will felt.  I have proof.  But it can handle a lot more abuse than plain wool - which felts if you look at it cross-eyed on a humid day.

Here's the silk.   I wish the photo did that luster justice.    Naturally dyed silk just glows.  So pretty!

The fiber that I think did best with the natural dyes was alpaca.    It took the dyes beautifully, retained its softness and luster and glowed like the silk.    Absolutely gorgeous. 
When you look at the card this way, you can immediately see which mordants and mordant combinations  produced the best color and the best variety of color.

Hands down, alum is the winner.    It's also the safest mordant to use - it's very safe.   If you have to use only one mordant with your natural dyes, then choose alum as the premordant.

Here's a different perspective of the alpaca samples above.    The left set of the samples was pre-mordanted with tin.  The center set of the samples is the one with alum as the pre-mordant.  The right set had no pre-mordant at all. 

Look at the center sets.    All of these were pre-mordanted with alum and tartaric acid.
See the darkest set of samples in the center of every dye card?    Those were post-mordanted with iron.  The top dark one had an additional afterbath in an ammonia solution at the very end.  The second dark one had no additional afterbath.  

The pair of samples just above the iron ones was post-mordanted in copper.   The top of that pair had an additional afterbath in an ammonia solution at the very end.  The lower of that pair had no additional afterbath. 

The top pair of alum samples was post-mordanted in tin.  The top of that pair had an additional afterbath in an ammonia solution at the very end.  The lower of that pair had no additional afterbath.  

The bottom pair had no post-mordanting at all.    The top of that pair had an additional afterbath in an ammonia solution at the very end.  The lower of that pair had no additional afterbath.  

Here's the comfrey sample [Just right of the blue sample in the long pic above this one.    You see the four pairs of alum samples?    From left to right:  tin post-mordant, copper post-mordant, iron post-mordant and no post-mordant.    

This is a good illustration of how each post-mordant affects natural dyes in general.   
  • Tin brightens
  • Copper greens
  • Iron darkens

Wednesday, February 27, 2013

Natural Dye Sample Project: Part 1

Several years ago, a few friends and I set out on a quest to dye ten different fibers with ten different natural dyes.

We also wanted to see what differences we could get on the fibers with different pre-mordants.

And post-mordants.

And afterbaths.  

It turned into kind of a big deal.    A big, glorious, messy, complicated, time-consuming, natural dye deal that took us about 2 1/2 years to complete.

Well.

It's done.    Ta-DA!
And we have these wonderful books full of natural dye samples to use as reference now.

This is how we organized things:  

The fibers:   linen, cotton, rayon, tencel, bamboo, silk, wool, superwash wool, alpaca and mohair.

The dyes:  logwood, cochineal, brazilwood, madder, walnuts, apple twigs, osage orange, goldenrod, comfrey and indigo.


The pre-mordants:  alum/tartaric acid, tin, nothing.
The post-mordants:  tin, copper, iron, nothing.
The afterbaths:  ammonia, nothing. 

For each fiber, for each dye we have a page that lists every combination of pre-mordant, post-mordant and afterbath,  Blow this pic up to see the details of the sample sheet.


We  also had a section for notes that tells us exactly how we did the dye, etc.  Notes are important.    Because I don't remember a blasted thing anymore.

Here's a pic of the notes we took on using walnuts.   Walnuts give gorgeous brown dyes, but it takes a couple of days to pull the color out of them.     That's the kind of thing you want to remember.

It took forever to punch all the holes in the cardstock, and then attach all the samples, but it was worth it.   [We tried drilling them, but...uh...no.].   There are 90 sample cards and 24 different combinations of mordants on each page. [A couple of cards have more than one set of samples.]   That is 2400 different dye samples all organized in binders for each of us. 

No wonder it took 2 1/2 years.

Tomorrow, I'll show you the fibers that dyed the best and talk a bit about the process. 


Tuesday, February 26, 2013

Winter Visitors


A flock of these guys stopped by last week.   About 100 or so - all over the gardens and yards.  


We see a bunch of them every winter.  I think they were headed north - just in time for that last cold snap.   They only stayed for a few hours.


One year, they showed up in January - in the snow - and I could not figure out what on earth kind of bird they were that looked so much like a robin in January.   I was sure they were something else.

Nope - just plain robins.   

Monday, February 25, 2013

Window Hyacinths

Most years we force hyacinth bulbs in the windows because they're so pretty.   [Read:  I get crazy around the second week of January and this keeps me from going completely bonkers before things get warm again and I can spend a few hours outside every day.]


These particular vases were designed for just this purpose.  The bulb sits in the top and you keep the bottom full of water.   It only takes a day or so for the roots to really get going.  


Here's the thing though - you don't need a fancy vase to do this.  A couple of inches of pebbles in a canning jar will do the same thing.  


We generally get the bulbs in the fall and then put them in the fridge until after the holidays.   


Then all you do is pull them out and set them in the jar and water them.   Make sure the water level stays up pretty near the base of the bulb.


After a few weeks, the buds start showing.    This one is just starting to show blue.   

I think I may survive the winter.


Saturday, February 23, 2013

Blogiversary Giveaway

It's been a while since I've done a giveaway on the blog and since we've just passed my two year blogiversary,  and since I just had my 100,000th pageview, and since it's that time in between winter and spring that is just so....so....transitionary-al-ish,  I thought we needed to give something away.  And, I thought it would be nice to give something away that is red.

Red is warm.   Red is good.  Red is the color that gets me from Christmas to March.

So I collected this cute little red whisk and this awesome grater/zester with the attachment that holds stuff like a nutmeg for you as you grate so you grate only the nutmeg and not your knuckles.   Because we don't want so see that kind of red.  They're both made by KitchenAid.


And I wrapped it all up with one of my own handwoven towels in a fabu red plaid, with stripes in cherry, lemon, lime, orange and sky blue.   I love these towels.  I wove them myself.  100% cotton.   Machine washed and dried already, so you don't have to treat it daintily.   Use it!   Love it!   Then toss it in the washer and dryer with all the rest of your towels.

The Rules:
  • Leave a comment telling me what you're looking forward to this spring.
  • Please consider friending/following me on facebook or Twitter or Google + [Links on my sidebar, near the top - that's what the barns are.]
  • Please consider voting in the cookbook poll at the top of my sidebar.
  • Open only to folks in the U.S.
Giveaway will be open until 11:59pm March 1st, 2013.  The winner will be selected at random from the comments and posted later that week.  Please only comment once.  

If you want to see my other handwoven towels,  here's the link to the towel section of my Etsy shop.  I'm sure you'll find a color you love.


Friday, February 22, 2013

Citrus Sugars

I showed you the citrus salts I made a couple of days ago. 

Well.

I made some citrus sugars at the same time.    Because if you're going to zest one lime, you might as well zest another.   And another.   And then a lemon or two or three while you're at it.   And then stir that zest into sugar and make yourself a jar of lemon sugar and then a jar of lime sugar.

They're so good. 

Have I said that before?


For the sugars, I decided to use a whole cup of sugar for every fruit I zested.    The flavors were more delicate that way.

Delicate is good.   Sweet and delicate is even better.

Here are some ways you can use these citrus sugars:
  • In drinks of all sorts - like tea!
  • Sprinkle on cookies
  • Sprinkle on muffins
  • Sprinkle on top of frosting for a citrusy sparkle.
  • A spoonful in a glass of  sparkling water is delish!
  • As a substitute for plain sugar in shortbread or spritz cookies. 
  • In puddings
  • Sprinkled over fruit kabobs
  • In candied sweet potatoes

Citrus Sugars
www.rurification.com
  •  zest of one fruit
  • 1 cup sugar
Mix the zest and sugar together in a jar.   Shake until well combined.   Will keep indefinitely.   But don't kid yourself - it's not going to last all that long.


Thursday, February 21, 2013

Hoop House

This is my new hoop house.     We've been using cold frames for years - and I love them because I can grow greens all winter long.

All. Winter. Long.

But there's one big problem with the cold frames and that's that they're too short to get into easily.   Especially when they're all bundled up in the cold.    It's a serious pain to uncover them and get in and harvest quickly.    And then bundle it all up again.

So I've been thinking about doing something taller, that I can walk into.   Taller would let me double cover things - the big outside cover plus inside row covers to keep things warm even when it gets to 20 below zero, which happens out here occasionally.

Taller, but still cheap.     And fast to build.

Eliot Coleman had some great ideas for hoop houses.   See this post for my review of his Winter Harvest book.   He makes his with electrical conduit and they grow things in Maine, all winter long.

Dude.  If he can, we can.

So Eric started thinking and planning and scrounging and shopping.    This is what he collected.
  • 14 - 10' lengths of 3/4 inch pvc electrical conduit  [$27 total]
  • pvc cement [$3]
  • uv stabilized zip ties [$4]
  • plumbing strap [$1.50 for 10 feet]
  • screws [$4.50 for a 1 lb box.   You won't need anywhere near that many.]
  • 6mil plastic sheeting [$72 total for 100 ft of 20' wide sheeting.   We figure it'll cover three houses]
We had most of this stuff around here already, so all he had to bring home was the pvc and the plastic sheeting.     We figure it cost around $50 per 8x10 hoop house if you buy everything new.   The hoops will last for years and the plastic will, too, if you roll it up neatly and store it between seasons.  If it lasts just three years, then that's less than $18 per year for a really nice cold frame that will extend your harvest at least two months every year and if you plan well will allow you have fresh vegetables 12 months of the year. 

This is how we built it:

We joined two sections of  pvc so they'd be 20 feet long and we glued them together.  We made 6 of those 20' lengths.  Then we took them over to the existing 8x10 garden bed and bent them so we could shove the ends into the dirt.   The 6 hoops span the 8' length of the bed.   

Eric took one of the remaining 10' pieces of pvc and attached it across the tops of the hoops.  He drilled holes through the pipes and used the zip ties to connect the 10' piece to the tops of the hoops.   The last piece of pvc was cut in half and then he attached those as triangles on one side of the house to further stabilize it.    You can see it sort of in this pic to top right.   There's another triangle out of the pic on the bottom right, pointing down to the front corner of the bed.

Once it was all stabilized, we covered it with the plastic.   The 20' width of the plastic just fits over the hoops with enough to lay on the ground on both sides so that we could 'attach' it with cinder blocks.  There were 4-6 inches left on the ground on either side. 

More rural recycling.    These cinder blocks show up out of old chimneys and shed foundations and stuff and they're too good to throw away, so we toss them in our masonry piles [one pile for bricks with holes, one pile for bricks without holes, one pile for broken bricks, one pile for old limestone, and one pile for old cinder blocks and square concrete.]   We use these cinder blocks for steps and seats and weights.    We actually stripped our whole pile to use as weights on the plastic. We put every block we had on the sides and ends to weight the plastic down so it wouldn't blow off.

Inelegant, but it works.
I cut the plastic on the ends long so it would come all the way down from the top and lay on the ground a bit to be weighted so the plastic wouldn't blow off.  

I folded it across the back end like this.  It keeps the sides tight.

I did the same to the front.

And that evening the wind started to blow.  Hard.   And all night long I wondered if our hoop house plastic would end up in Indianapolis.   We got up in the morning and it was just fine.   Then the wind blew harder.   And harder.   And by the time we got home from our school co-ops that afternoon, one little section of plastic in the front had blown free.   I dropped another weight on it and that did the trick.

So I can definitely say that these babies are sturdy as long as you weight them down very very well.

I planted peas, greens, radishes, carrots, lettuce and fennel inside.    They should be leaping out of the ground.   If we get a serious cold snap, I'll drop a row cover over things to keep them warmer.

I'll keep you posted on how these work.

Wednesday, February 20, 2013

Citrus Salts

I saw these over at Food in Jars and was instantly smitten.

Smitten, I tell you!

And since I've been making marmalade and stuff, I thought I'd give them a whirl. 

I made lemon salt and lime salt. They're so good.  

All you have to do is zest the fruit and mix it with salt.     I used the zest of 1 fruit and mixed it with a half cup of salt.

The zest makes the salt sort of damp, so I tried letting the zest dry out for a while to see if it made a difference.   It didn't.   The salts work great just like this - no fuss, no muss. 

Here are a few ways to use the salts:
  • adult drinks
  • grilled meats
  • skillet seafood and meat dishes [Loved it on pork.]
  • potatoes  [Lime salt on sweet potatoes!]
  • oven fried chicken
  • steamed vegetables 
  • popcorn
  • pasta

Citrus Salts
www.rurification.com
  • Zest of one lemon or lime
  • 1/2 cup salt
Shake the zest and salt together in a jar until well blended.   Enjoy!  They'll keep for a very long time and make great gifts!

Tuesday, February 19, 2013

Beeswax Candle

Bayberry candles are one of my all time favorite things in the whole wide world.    I love them.   I also love beeswax candles.   I love how they smell when they're burning.  

I saved all our extra wax from last year and melted it down into a block so I could make candles with our own wax from our own bees.   Since I wanted really special candles, I got a pound of bayberry wax from betterbee.com to add to them.

Actually, I wanted to render my own bayberry wax -[You get the bayberry wax by boiling  bayberries.  The wax coating melts off and floats.  When it cools, it becomes hard like any other wax].  - so I spent days and days searching for a source for bulk bayberries by the pound.    No go.   If you ever find a source, let me know.     In the meantime, I may have to plant some bushes here.  We'll see.

I save my old candle jars for just this purpose, so I taped a wick to the bottom of the jar so it wouldn't wiggle and then wrapped it around a pencil that I laid across the top.  [I used the zinc core wicking for this candle - still experimenting with different wicks]  When the candle was cool, I cut it at the length I wanted. 

Traditionally, bayberry candles were made from half bayberry wax and half beeswax.  So that's what I did.    In a double boiler unit, I melted a hunk of beeswax and a hunk of bayberry together.   When they were all hot and melted, I poured it into the candle jar. 

To prevent the wax from heaving as it cooled, I turned off the burner under the hot water in the pan and set the candle jar right in the water and let it all cool overnight.   Worked like a charm.

Our wax is screaming yellow and bayberry wax is a gray green/olive color.   The two together make this nice yellow green.

It smells divine. 

Monday, February 18, 2013

More Bee Candy

In January I made bee candy to put in the lang.    Candy making is not exactly my forte and when I mentioned it on the bee forum, someone was nice enough to send me a slightly different recipe.    I tried it out and I like this one a bit better.

Thank you Tefer2!

Tefer2's  Bee Candy
www.rurification.com
  • 5 lbs sugar
  • 2 cups water
  • 1 tablespoon white vinegar
Use a tall pan with a wide bottom.   Like this one.

Bring water to boil and stir in vinegar and sugar.    Return to boil.   Stir a few times until it starts boiling hard, then leave it alone.   Heat to 242 degrees.     Turn off heat and let it sit until it cools to 200 degrees.  Stir until opaque and pour into molds, bowls, etc.

Tefer2 says this:
'The trick with the final stirring is cooling it before it starts to set up on you.  If you let it cool too much it will get too hard to pour. I start my final stirring somewhere between 180-200.  The hotter it is, the longer you will have to stir to cool it to reach opaque color.   I line my mold with clear saran wrap so it doesn't stick.   Use extra wrap over the sides because it shrinks some from the heat.   You can use any size mold you like.   You can even just pour it out flat on a lined baking tray.   The vinegar works better than cream of tartar.'

I did pour it flat on a baking tray covered with aluminum foil.   Worked great.  Broke apart into chucks that fit nicely on the frame tops.    

To speed up the stirring, use a mixer or hand blender.   Quit as soon as it starts to cloud up because it'll set up fast then. 


Sunday, February 17, 2013

Mystery Cast Iron


The kids pulled this out of the creek.  

It's cast iron, not as rusty as I'd expect for being in the creek for very long.  

It's kind of pretty.   I wonder what on earth could have broken something that big.  

We have no idea what it is.    Feel free to guess in the comments.  

Saturday, February 16, 2013

Deadout

One of my hives died this winter.   It was my strongest hive going into the winter, so I was very sad and also pretty surprised.

Here is a very bad pic of the dead bees in the bottom of the hive when I opened it up.     That's a lot of dead bees. 

To find out what caused it, I opened the hives and I examined the frames.


You can see the cluster in this pic.   All of the bees in the circle are dead.  The cluster was just a bit bigger than a softball.  It extended three frames wide.   That's pretty small to get through the winter and keep everybody warm and fed.


Here's a pic of what I found when I knocked the dead bees off the surface of the frames.

Blow it up to see all the bee butts sticking out of the cells.   This is a sure sign of starvation.

The problem is that there was a lot of honey still in the hive.   A lot.    They shouldn't have starved.


So the next  question is:  Why didn't they move to the stores?

Notice the rough spots at the tops of the open cells near the capped cells.   Those are chew marks from the bees opening the stores.   This is right next to where the cluster is, so I have to wonder why they starved.   They were so close!

Could be they were too sick or too cold because the temps here vary so greatly and the cluster was too small.  

One of the things a beekeeper must ask is whether the mite load was heavy and caused too much stress on the bees during our wild and crazy winter, thus weakening the hive and causing the deadout.

To check the mite load, I pulled the bottom board out from under where the cluster was [and all those dead bees].   The bottom board closes things up way down under the bottom screen of the hive.   The screen keeps the bees in, but allows for good ventilation - essential here where it's so humid.   The bottom board slides in under the screen and helps close things up to keep them warm for the winter.

When I pulled the bottom board I found a lot of tiny wax pieces.   Those are the wax cappings that they've chewed off to get to their stores.

With a magnifying glass I counted mites.   The dark oval in the pic is a varroa mite.  That's a bee leg next to it.  The mite is tiny - the size of a chigger.   But on a bee, it's big.   To a bee, one of these is the equivalent of a mite the size of your fist on you.    Eew.  

I counted only 5 mites.   Not bad at all.

All bees in this part of the country have mites, just like all forests in this part of the country have ticks.   It's a fact of life.  There are things you can do if they get bad, but generally you encourage good hygiene and small cell size and the bees manage.

I showed these pics to the experts at Beemaster  and they agreed that the cluster died because it was too small.   There's no way to determine why the cluster was too small - could have been the robbing in the fall, and the robbing might have resulted in them going queenless.   The bees had dysentery, but folks seem to think that it wasn't bad enough to kill the cluster, just further weaken it.

If I had been on the ball and known what I was looking at in January, I would have recognized the small cluster size right away and then  reduced the inside space of the hive with a follower board, which would have been less space for them to heat.   That might have given them a chance. 

Also, from now on I'll be checking the hives in late November to see what the cluster size is so that I can reduce the hive size earlier if need be.   In the horizontal hives, you can see the cluster size easily when you lift the lid and you can see right where the cluster is.    All you have to do is put a follower board where you want it to close up [narrow up] the hive space inside.  

Next year, we're going to set the hives right next to each other with just enough space for insulation board between them.   That'll help keep things warmer, too.

The last question is what to do with the dead hive full of honey.    I asked the folks at Beemaster and they suggested just leaving it for the other hive to clean out for me.   The day I opened it up for these pics, the other hive was pretty busy checking things out.    If you blow up the pic you might be able to see the hundreds of bees on this hive trying to harvest it.   


Friday, February 15, 2013

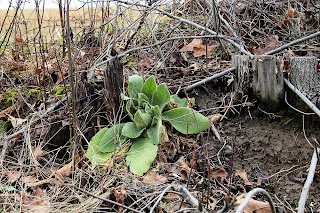
Common Mullein

Its formal name is Verbascum thapsus.  It's a transplant from Europe, brought over for its healing powers.

It pops up everywhere out here.   We find it along the roadsides, creeksides, barn sides, and even on the rocks where a bit of dirt might gather. It's not fussy.  It's tough and grows in the most unlikely places.


2000 years ago, Dioscorides recommended the plant as a curative for lung problems - coughs, colds and bronchitis.   It has been included in many official and national formularies.

Bigger plants stay green all winter here - a lovely sight in January when everything else is brown.  I love the silvery green. 

The flowering stalk gets about 5 feet tall and has small yellow flowers along it.   Rumor has it that the flowers are good as a natural dye.    I've never used it, since collecting them would be tedious and it would take a long time to get enough to dye much at all.


Thursday, February 14, 2013

Chocolate Raspberry Jam


I saved my favorite for last.

Confession.   Those are frozen raspberries.  Which is why they don't look fresh.  They used to be fresh before they were frozen.    I'm hoping that counts since it's February and fresh raspberries cost as much as a new transmission, which is costly, let me tell you. 

And let me tell you that even though these were frozen raspberries, this jam was so delicious that it was all I could do to pry it away from everyone and not eat the entire contents of the jar for dinner.

It's that good.


Chocolate Raspberry Jam
www.rurification.com

1   12 oz. pkg frozen raspberries.   Or 2 cups.  Whatever.
1 cup water
2 Tablespoons Low Sugar pectin [Use only 1 T to keep it thin enough for ice cream.]
1 cup sugar
chocolate:  1.3 oz chocolate bar or 1/3 cup chocolate chips.  Or as much as you want.   Seriously.  

Cook the raspberries and pectin in the water until the raspberries are soft and broken up.  Feel free to mash them more if you like.   Bring to a hard rolling boil and boil for one minute.   Add sugar and chocolate.  Return to boil.   Boil one minute.    Yield: Just over a pint.

Note:  This was sweet, but it wasn't very sweet.   You might want to add more sugar especially if you're using a dark or less sweet chocolate.   Taste it after you've added the sugar and chocolate and things have melted down.    If it needs to be sweeter add 1/2 cup more sugar.    Then finish.

On ice cream.   A. Mazing.

UPDATE:   I used regular pectin for this jam and it did not gel at all.    You really need a lot of sugar to make regular pectin work.   Keep your eyes open for low sugar pectin and use that whenever you can so that you have a lot of flexibility over how much sugar you use in a recipe.     I recommend 2 T low sugar pectin here because I know that gels when I make raspberry jam.    1 T will give a soft gel.

Want the recipe for this Chocolate Jam and a whole lot of other terrific jam recipes?   Check out my ebook:  A Simple Jar of Jam  at www.rurification.etsy.com.   You can preview the book by clicking the link on the sidebar.  Every purchase helps support this site.  Thank you!


Wednesday, February 13, 2013

Chocolate Ginger Pear Jam

The whole point of this jam was the chocolate and ginger pairing.    But the ginger needed a vehicle, so it quickly became a chocolate ginger pearing, if you will.  

Sorry.

And since it's February and fresh pears aren't always easy to find and since most folks have canned pears in the cupboard,  and since canned pears are already cored and peeled and cooked into soft deliciousness, I figured I'd make this jam with canned pears.

Indeed.

So, the cute little seckel pears you see in the pic are not what I actually used to make this jam with, but they were a lot more photogenic than the cans of generic pears that I did actually use.

Sorry.

Here's a pic of the crystallized ginger, which you'll agree is photogenic in and of itself.

Indeed.

I love crystallized ginger.   Check my sidebar for a link to a post on how to make this stuff yourself.

Since this jam is mostly about the chocolate and the ginger, feel free to load up on the ginger.   And the chocolate.    You won't be sorry.

Indeed.

Chocolate Ginger Pear Jam
www.rurification.com

2 cans of pears.  The regular size, not the big ones. 
1 tablespoon pectin
1/3 cup sugar [since there was sugar in the syrup that the pears came in, you don't need much.]
1/2 cup minced crystallized ginger
1/3 cup chocolate chips

Drain off most of the pear syrup.  It's OK to leave some in there to cook stuff in.  Dump them in a pan with the pectin and mash them up with a potato masher or a fork or the force of your personality.   Whatever it takes.   Just mash them to the consistency you want.  Chunky is fine.  Puree is fine.   Bring to a hard rolling boil that you can't stir down.   Boil for a minute.   Add the sugar, the ginger and the chocolate.    Bring to a hard rolling boil again and boil for a minute.    Yield:  Just over a pint.

This stuff is really good on ice cream.   Or with a spoon right out of the jar.   Mmmm


Want the recipe for this Chocolate Jam and a whole lot of other terrific jam recipes?   Check out my ebook:  A Simple Jar of Jam  at www.rurification.etsy.com.   You can preview the book by clicking the link on the sidebar.  Every purchase helps support this site.  Thank you!


Tuesday, February 12, 2013

Chocolate Orange Jam


I've been playing with chocolate jams for a while now.   We love them on ice cream.   Or right out of the jar with a spoon.   We're not picky. 

Over the next few days, I'll give you three versions of this chocolate wonderfulness.   Chocolate raspberry, chocolate ginger pear and chocolate orange.

I made the chocolate orange first because I was making marmalade anyway.   I made a lot of marmalade.   So, I made another little batch of plain marmalade and dropped in a disc of that fabu Organic Stone Ground 70% cacao Extra Dark Chocolate that you see in the pic.   

It was extra dark.

It was stone ground.

It was to die for.

A note about the chocolate.   Don't make a special trip to the store for special chocolate.  Unless you want to.   You can substitute 1/3 cup of chocolate chips.  Or any chocolate bar.  Or cocoa powder as a last resort.  We tried this with all three and much preferred the chips and chocolate bar type chocolates.   The cocoa powder was OK, but not quite as good. 

Also, you should feel free to use more chocolate if you want to.   I mean 'chocolate' is the first word in the name, so you should load up if you want to.    Seriously.

Chocolate Orange Jam
www.rurification.com

4 oranges, zested and sectioned.
1 cup water
3 cups sugar
1.3 oz  disc of chocolate, or 1/3 cup chocolate chips

Zest the oranges and get it boiling in the water while you section the oranges.    Toss in the oranges and sugar and boil down until just before it reaches the gel point for your altitude.   [See Jam page, tab above, for that information]   Grate the chocolate into the jam and stir until it's well combined.    Let it finish cooking until it reaches the gelling point.    Yield:  just over a pint.

Note:   This is a no-pectin recipe.   It's hard to get no-pectin recipes to gel just right.  Don't worry about it.   Err to the side of too thin - it pours over ice cream and waffles better that way.     If it's too thick, then you can't get it out of the jar when it's been in the fridge.  That's a bigger problem than too thin, in my view.

Want the recipe for this Marmalade and a whole lot of other terrific jam recipes?   Check out my ebook:  A Simple Jar of Jam  at www.rurification.etsy.com.   You can preview the book by clicking the link on the sidebar.  Every purchase helps support this site.  Thank you!


Monday, February 11, 2013

Class: Spinning 201, Intermediate Spinning

Look at those beautiful hands spinning that beautiful yarn.    I love watching people spin. 

I'll be teaching Spinning 201 - Intermediate Spinning  at White Violet Center, St. Mary of the Woods College just outside Terre Haute, Indiana on Saturday, March 2nd.    9 am - 5 pm.   $110.

This class is for people who have already learned to spin.   It's OK if you're a bit rusty.   We'll be reviewing whatever skills you need, then we'll do some plying [2 ply, 3 ply and Navajo plying]  and then hit a bunch of new fibers for you to practice on. 

You can bring your own wheel and your own fibers if you like.   There are wheels available at White Violet if you don't have your own.   

Check out the link above for details.    Email me with questions about what we'll be doing.  Email White Violet Center with questions about registration, etc.    I hope to see you there!

Sunday, February 10, 2013

Barn

I love all the angles and lines on these old places. 
The snow did a number on local barns this year.   We lost a half dozen or so that I'm aware of.   This one is down the way from us.   It's still upright, but you can see it's starting to sag.    So am I for that matter.

This is a big barn - used for hay for years and years.   That's a drive through door on the right.   You used to be able to drive a tractor pulling a hay wagon right through to unload and then out and around the back of the barn.  

You can see how that one section of wall has warped away.   Blow the pic up to see all the hay spilling out.   

Related Posts Plugin for WordPress, Blogger...