Friday, May 31, 2013

Celery and Leek Starts


A while back, I talked about the kinds of cool things you can regrow from the veggies you get at the grocery store.

Here's the link to the original list of stuff you can grow from your kitchen scraps.

I've had great success growing leeks this way.   Eeeeaasy.  They come screaming out of the ground.

We decided to try some celery, too.


I don't like celery much by itself, but I like it in soup stock.  We buy a few bunches every year, then cut them up into little chunks and dehydrate them.  Then they go in bags in the freezer so we can grab a handful at a time to toss into soup stock.   Mmm.

This time, I cut the bottoms off and popped them into a bucket with a little water.   Instant new growth.

I had three and cut them at 1", 1 1/2" and 2".  The 2" one was happiest and put out new grown the very next day.  The middle one took a few more days. The 1" took its time, but did eventually put out some new growth. 

My recommendation:   Cut off at least 2-3 inches from the bottom of the celery bunch if you're planning on re-growing it.   As soon as you see green and/or roots, pop it in some soil.

Just as easy as the leeks!

Thursday, May 30, 2013

Turkeys


We were driving down the road the other day and happened upon a turkey displaying for his girlfriend.

We see these every year, but this time we happened to have the cameras with us and got a few pics.   They're not great because that guy was way way down the road, but they are indeed photographic evidence of all those feathers.


We thought from his stance that his girlfriend was on the right side of the road, but  she was actually on the left side of the road.  


I imagine that if we had stayed for another 15 minutes, he would have turned around a few times.   Unfortunately he made us late for an appointment as it was.

It was worth it.

Wednesday, May 29, 2013

Tent Caterpillars Revisited


Remember the tent caterpillars I talked about a couple of weeks ago?   Kind of eww, kind of cool.


We've got rather a lot of them this year.  They've emerged from their tents and are eating everything in their path.    These guys are on a chokecherry tree. 


All that was left were a few blooms on the tips of the branches.  The caterpillars had eaten every leaf.   Look at the pic above again.   See what I mean?


Then they dropped to the ground where they gathered by the hundreds [at least] on the multiflora roses.   The roses are pests, too and heaven knows there's enough of them to share, but it's still kind of eww to see that many munching crunching caterpillars all over them.

You can hear the munching and crunching. [shudder]  At which point the eww factor far exceeds the cool factor. 

Tuesday, May 28, 2013

Bee Inspection


We split our hives on May 1st.   A couple weeks later, Lily and I went in to make sure that there were queen cells in the lang.

We did find some - here's the pic.

Just in case something goofy was going on, we put another frame of larvae and eggs in that hive from the hive with the queen.  That way, if the bees don't like how things are going with the current queen cells, they have fresh material to build new ones with.


In other news, at the bottom of that hive, I found this thing.   I had seen it trying to get into the hive a few days prior and commented on the sheer enormity of it.  That's one of my bees to the left of it.

It's enormous.  E.Normous.

Huge.  Gigantic.  Colossal.

Really big.

And really dead.   It got into the hive and the bees took care of it.    And while Lily and I were marveling over it, another one came around to investigate the open hive.

I killed it and as it died, it tried to use it's stinger to get me [actually the hive tool I was using to kill it it with].   Holy cow!  The stinger is long and flexible, so don't pick a fight with these.

The good news is that they are Giant European Hornets, Vespa crabro, brought over in the late 19th century.  They are not the hornets of the papery bag nests that hang in trees, those are the little black Bald-faced Hornets, which are really wasps.   These are the true hornets.  A lot less common and a lot less mean.  

Not something I'd like to meet in a dark alley, but maybe as a bouncer in a nicer nightclub.  

Monday, May 27, 2013

Skeleton


I rounded a bend in one of our paths and found this.  Surprise!

Thank heaven it didn't stink.  I cannot abide stinky skeletons. 

I'm pretty sure I know what it is, but I'll let you all guess in the comments.   Note:  It's in a wet depression.  The fur isn't normally green.  At least we've never seen a live green one, but there's no telling what crazy things lurk in these here hills.

Sunday, May 26, 2013

Elderberry Progress


All six of my elderberry starts are alive.  This is the happiest one.  We planted it just up from the chicken coop at a place that gets a lot of run-off from the hills in the spring and then the veg garden all summer.

I think it likes it there.

Saturday, May 25, 2013

Nepeta

Nepeta mussini is my favorite catmint.   It's a smaller relative of catnip and it blooms right about now,  after the violets, with the iris and daisies.   I love it.   The bees love it, too.

Friday, May 24, 2013

Sensitive Fern

In a wet place in a back corner of our property there is a bog full of siberian iris, spearmint, apple mint, a large swamp rose and these ferns.   Also a lot of jewelweed and a purple perilla, but more on those later.

The ferns are coming up.

We only have 4 kinds of ferns in the woods and you'd think it would be easy to Google ID them, but I had to do a bit of chasing around to figure out exactly what these were.   I started here for general ID purposes.  Those pics gave me the family I was looking for.

Usually I like to use the Latin name, because sites that use the Latin generally have more complete information.

Generally.   In this case, I didn't get very far until I used the common name.   That got me another Latin name - the right one - which got me a lot more information and a firmer ID. 

This is the Sensitive Fern.   Onoclea sensibilis.   It loves the creek - especially where it floods a lot.   I like it because it gets tall enough to hide other, less attractive weeds.  [You know who you are.] and it looks like it's there on purpose instead of just a happy accident.

This fern shoots up a seed stalk that's about 30 inches tall and turns brown and lasts through the winter.  Very distinctive.   If you think you have these, look for the stalk.   It's a great way to ID these through the winter.

Thursday, May 23, 2013

Grape Jelly from Store Bought Juice

Jelly!   Real jelly!   The kind you can see through. And it holds its shape just like store bought jelly  And the color - it's gorgeous.

And I didn't have to squish the grapes and strain anything because the nice grape juice manufacturer people did it for me. 

I love them.

This is grape jelly you make yourself from frozen juice concentrate from the store.   I got the stuff with no added sugar or preservatives or anything but grape juice. Then I used my basic recipe for making jam by proportion.

Jelly Proportions for firm jam - fruit, sugar, pectin
www.rurification.com

  • 1 cup fruit juice
  • 1 tablespoon low sugar pectin per cup of juice
  • 1/2 cup sugar per cup of juice

I've extolled the virtues of low sugar pectin before.   I like it because I control the amount of sugar that goes into the jam and I still get the jell I want.   I've made this jelly with all Splenda before and it works great and tastes terrific.  In fact, you don't have to use any sugar at all.

You can use juice made from frozen juice concentrate [which a nutritionist friend tells me is better for you anyway because more of the vitamins are intact] or you can use juice in a can or bottle or jar or juice that you've done up yourself. 

It's important to start with juice that has No Added Sugar.   Sweetened juices mess with the pectin and you can't get a reliable jell.   Don't do that to yourself.  

You can start with whatever amount of juice you have.  Measure it out and then once you know how many cups you have, figure the pectin and sugar and make your jelly. 

It's easy.

You can make a big batch or a small batch. 

Don't use more than 6 cups of juice at a time per batch.   I like to use 4 cups per batch.  Put the juice and pectin in a pot and bring to a hard rolling boil that you can't stir down.  Boil hard for 1 minute.  Add sugar and return to hard boil.  Boil 1 minute.  Ladle into jars.

Yield:  For every 2 cups of juice I start with, I get 2.5 cups of jelly.   


Wednesday, May 22, 2013

Lilacs

Lilac time.  

They bloom right at the edge of the season - around the very last frost.  They don't last long, but they smell divine. 


Ours came with the house and we divided them and let them get big.  This time of year they are glorious and they have loved all the rain and the slow cool spring.


They are the old fashioned ones.  Loosey goosey in habit.  Big blowsy bushes about 8 feet tall.  The buds start out rosy, but they open much bluer.  The contrast of pink and blue and purple is one of the things I like best about them.

The bees and butterflies love them.   If you stand still in front of the bush, you can hear the humming and buzzing.

Tuesday, May 21, 2013

Swarm Capture

It's swarm season.   As soon as we start seeing drones, we know that the hives are working full tilt to expand for the season.  The hive assesses things and decides it's time to split.  They make new queen cells and raise new queens and when the first ones start to come out, the old queen gathers half the hive and they swarm.

This swarm came from a friend of ours who had a hive in a tree in her backyard.   Happy, calm bees.  They swarmed and she called us and by the time we could gather stuff and get there, they had clustered nicely in a branch just a few feet away.  


Eric cut the ends off the branches and then put the whole cluster in a bucket.  I stood below to catch and Lily took the pics.

When the first part of the cluster hit the bucket, Eric got pinged a few times.   Serious ouch.

This is me looking through the cluster for the queen.   Never found her, but the bees were fanning, so we figured she was in there.

Notice the frame of drawn comb with a bit of honey in the bucket.   I hoped that would make them feel at home.


Then I trimmed the branch down as far as I could so we could cover the bucket with a canvas.  

We bungeed the canvas down and then strapped the bucket in the back of the truck for the long ride home.


It wasn't as dark out as these pics make it look.   We took the cluster out of the bucket and put it into the hive with that frame of comb and several honey balls.

Bees love honey balls.


We put empty supers on this hive so there would be plenty of room for the branch.

Then we closed her up.

The first day they seemed to like the box, but two days later they absconded. 

Since they came from a tree, I figure the queen wanted another one.  Since we have an abundance of hollow trees out here, I figure they found a tree they like better than our boxes.  

You win some, you lose some.

Monday, May 20, 2013

Hoosier Hills Fiber Festival

It's almost time for the Hoosier Hills Fiber Festival, in Franklin, Indiana. This is one of our favorite shows of the year.  Two days of fiber heaven the first weekend in June in the heart of Indiana, just south of Indianapolis.

I'll be teaching two classes this year:   Tunisian Crochet, and Spinning on a Drop Spindle.  It's not too late to register!   Click on the link to the show above and get on the Classes page for all the details.  

You can find my booth in Scott Hall near the welcome center.  I hope you stop in and say hello!


Hoosier Hills Fiber Festival
Friday, May 31, 2013 Noon - 6pm
Saturday, June 1, 2013 9 am - 5 pm

Franklin, Indiana
 Johnson County Fairgrounds

Free admission and parking

Sunday, May 19, 2013

No Dumping


Dumping out here is a real problem.  It's infuriating to wake up one morning and find a couple of bags of garbage in your creek, just out of sight of the house.  Beer cans pop up like wildflowers.

Wherever there is a ravine close to the road, there's a pile of trash in it.  TVs, washers, tires, tires, tires, and other household garbage.  We've cleaned 40 bags of trash like this off our place.

We see signs like this around.  I love this one.  [Not that it did much good....] Blow the pic up to really appreciate how long the sign has been on the tree.


This is what's at the foot of the tree in the ravine below.

Heaven only knows how long that stuff has been there.  Tires tend to look fresh for a very very long time.

Saturday, May 18, 2013

Maple Blossoms

You really need to blow this pic up to appreciate the beauty of the sun shining through these tassels.  They're exquisite. [Click the pic to biggify.] 


This beautiful thing is a maple flower.  You can just see the tiny leaf forming above it.  A tree full of them reminds me of fringed Chinese lanterns.


Friday, May 17, 2013

Tent Caterpillars

We get these every year at this time.  I think they're equally really cool and really gross.

I'd heard them called bagworms, but they're not actually bagworms. 

They're tent caterpillars, Malacosoma americana. They especially like our choke cherry trees - and there are tents in every one of them.  They grow up to be moths.  Here are a bunch of pics of the adult moth.

I think they're pretty with the sun shining through the tents.  At least until they get full of frass [poop].  Then it's just disgusting.

Thursday, May 16, 2013

Helleborus Orientalis


I have a couple of hellebores that we've managed to keep alive.   They like to grow where the dog likes to sleep on nice winter days - under the trees in the deep leaf mulch we put there.  I think the dog has helped kill a few. 

The chickens love that leaf mulch, too, which probably accounts for the hellebore casualties that the dog isn't responsible for.

At any rate, this one bloomed beautifully a few weeks ago. It's the Lenten Rose. A red variety.  It's worth the wait every year. 

Wednesday, May 15, 2013

Hoosier Hills Rug Hooking Wool Fiber Arts Fair

This weekend you can find me in Washington, Indiana at the Wool Fiber Arts Fair sponsored by the Hoosier Hills Rug Hooking Guild.    It's a delightful little show and a great place to focus on rug hooking.  There are plenty of vendors, classes and all things fiber.  I hope you can come!


Hoosier Hills Rug Hooking Guild
10th Annual Wool Fiber Arts Fair
Saturday, May 18, 2013
9:00 a.m. to 4:00 p.m. EST
Conservation Club
350 W 150 S
Washington, Indiana

>>>Free Admission & Parking <<<


Eggs in a Nest

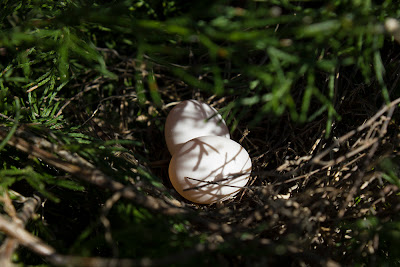
This is a mourning dove's nest.  They make lousy nests in dumb places.  This one was in a cedar tree (good place) right next to the path (bad place) and every time we walked by, it scared the bird out of it.  Eventually she abandoned it with these two eggs in it.  The eggs were gone a couple of days later

Tuesday, May 14, 2013

Old Bridge

This is another old skeleton we found on our walk on the old road a few weeks ago. It was missing some pieces off the sides, but it looked sturdy enough for a tractor to drive over.  I wish I knew when it was built.


I'm guessing this old road was abandoned because it goes right through the bottoms.  It must have been closed several times a year due to flooding and water damage.  Our floods are hell on gravel and dirt roads.  No doubt it was easier just to let it go. 

Monday, May 13, 2013

Rural Wreath

I saw this off an abandoned road that was so grown up it is all grass now.  It made me smile.  I wonder how old the tire is.


Sunday, May 12, 2013

Bluebell Wood

I have to say that one of my favorite times of the year is when the bluebells bloom here.  These are Mertensia virginica.  They're wild here and large colonies are common along the sandy and shady creek banks in the bottom lands.
Pretty, aren't they!

Saturday, May 11, 2013

Mystery Machine

One glorious spring day a few weeks ago, Lily and I went for a walk along an old abandoned road that we'd never walked before.  It was magical.

I love old roads because if you look carefully, you see the remnants of old inhabitants.  Old house foundations, old gardens, old tires, old barns, old bottles, old bones [deer or cow usually] and once in a while you hit a jackpot discovery of something wild and wonderful.


Like this crazy thing.

We rounded a bend and there it was at the side of the road.


I know you're thinking it, so I'm just going to come right out and say it.

What the heck is it?


I thought at first it was some kind of farm equipment, but now I don't think so.

Maybe road equipment?


Click to blow the pics up, then have at it guessing what it was.  I'd really like to know.

Friday, May 10, 2013

Hive Split

May 1st I did a complete hive inspection of our remaining hive with Lily assisting.  I had seen a lot of mouse poop in the sugar we fed in February and feared there was a mouse nest in the bottom box, so I knew we'd have to do a complete inspection top to bottom to clean out whatever was in the bottom.

Also, now's the time to do splits, so I was planning on taking at least a nuc's worth off and hopefully splitting two nucs worth off.  

There were a lot of bees in the top box, so I just took the whole box off and set it aside on a spare SBB [screen bottom board.] between the Tardis and the lang.

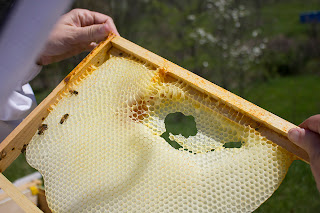
In the bottom box there was a lot of evident mouse damage.   You can see how the mouse started on one side and ate the honey through center to the wax capping on the far side.  Smart, but seriously aggravating.
This is what I found in the bottom of the box. A whole lot of wax cappings, dead bee parts, mouse droppings and other debris.

But no nest!   The mouse must have had a nest elsewhere and just come in from the top regularly to feast. The debris was a couple of inches deep on the bottom.   I cleaned it all out.

I went through every frame in the bottom box and there was no brood at all.   I knew then that I wouldn't be getting more than one nuc's worth of split, but since we're down to only one hive, I figured that was better than nothing. 

I  left one frame of honey on the south end and left the rest of the frames out.  I'd be replacing them with the split.

The other box was full of bees. I decided to do an even split and a walkaway.

A walkaway is where you take some of the bees out and put them in a new hive and leave them alone to make a new queen.

An even split is where you take the frames and deal them like cards - one frame for the old hive, one for the new hive, etc. 

There were five frames full of capped brood, larvae and eggs.  I could see where the first brood had emerged already and those spaces were full of larvae again.   Good queen!

Click the pics for closeups of the larvae.


Here's a close-up of the eggs.  They look like grains of rice in the bottoms of the cells.  The cells are yellow because the bees are tracking pollen all over everything right now.


We did sight the queen - and she's gorgeous.  Very calm. 

We ended up putting her in the Tardis with two frames of brood.The other three frames of brood I left in the lang.


I made a couple of mistakes that you can learn from. 

1.  Lots of beeks talk about checkerboarding - where you put an empty frame between the drawn or full stuff to encourage the bees to expand the hive.   I did that with the brood - put empty drawn comb between the brood frames.

MISTAKE:   You want the brood in a tight cluster because it's easier for the bees to keep it warm.  I just split the hive, so there are many fewer bees to keep the brood warm and this is Indiana - no telling what the weather is going to do for the next few weeks.

Checkerboarding is fine for honey supers, but not for brood.   I went back in a few hours later and took the empties out and tucked the brood frames next to each other.   I thank Michael Bush's book for making this clear to me [The Practical Beekeeper - link on my sidebar] Having that book handy is like having a 24/7 mentor.

2.  I put the queen and two frames of brood in the Tardis, with 7 more frames of honey and partials and the follower board.   

Pollen that fell out of some cells during the move
MISTAKE:  The Tardis is in a different place - all of the field bees are going to come back to the lang, which will leave a lot of bees with the 3 frames of brood in the lang, but will leave the Tardis short handed.   Short handed for keeping the brood warm in a big box. 

I went in the next morning to see how much action there was in the Tardis and while the brood was well covered, there just weren't a lot of bees coming and going, so I quickly went back in and removed 4 frames.   Now they have a frame of honey, 2 frames of brood, then 3 more frames of honey and partials - 6 in all, then I put in the follower board to make it a much smaller space to keep warm.   [A follower board is a removable wooden wall in the shape of a frame that you use to make the space smaller or bigger as you need to.]


I figure that the two hives are now on roughly equal footing for different reasons.

The lang has no queen, but they have three frames of brood in various stages, plus eggs, plus all the extra field bees.

They were super busy coming and going the next day and I think they'll do fine.

I'll keep an eye on things and after three weeks I'll go in and make sure they've got queen cells. 

The Tardis has fewer bees and only two frames of brood, but she has the queen. And she's a good queen.   I'm hoping that will make up for it.

Also, the Tardis has a window at the back so I can easily monitor the numbers.  If I need to shake a few extra bees into the hive from the lang, I can. 


When I was all done, I put the rest of the bee candy on the tops of the frames in both hives and put supers around them, then put rocks on the landing board in front of the Tardis entrance so they'd have to go around them to exit and enter.  They'll re-orient.   Also those bees were fanning like crazy during the relocation [pic], so I think any bees that moved with the queen will stick with her.  


Fingers crossed everything will be fine and they'll be ready for the main flow in a few weeks.


Related Posts Plugin for WordPress, Blogger...